
8 posts tagged with "cwcloud"

View All Tags

Get your Apple Watch data using CWCloud FaaS engine

· 6 min read
Idriss Neumann
founder cwcloud.tech

This blog post will help us illustrate a concrete use case for using CWCloud's FaaS1 engine — both to expose serverless functions as public webhooks, and to show how to interact with LLMs2.

Besides IT, I enjoy doing sports regularly, especially running and powerlifting. For some time now, I’ve been using an Apple Watch SE to collect metrics and track my progress, especially in terms of endurance and cardio.

For a "non-tech" user, the level of detail and data presentation during an exercise is very satisfying. Here's, for example, a breakdown of what happens during a run: GPS positions, heart rate, and zones throughout the workout...

apple-activity-dashboard

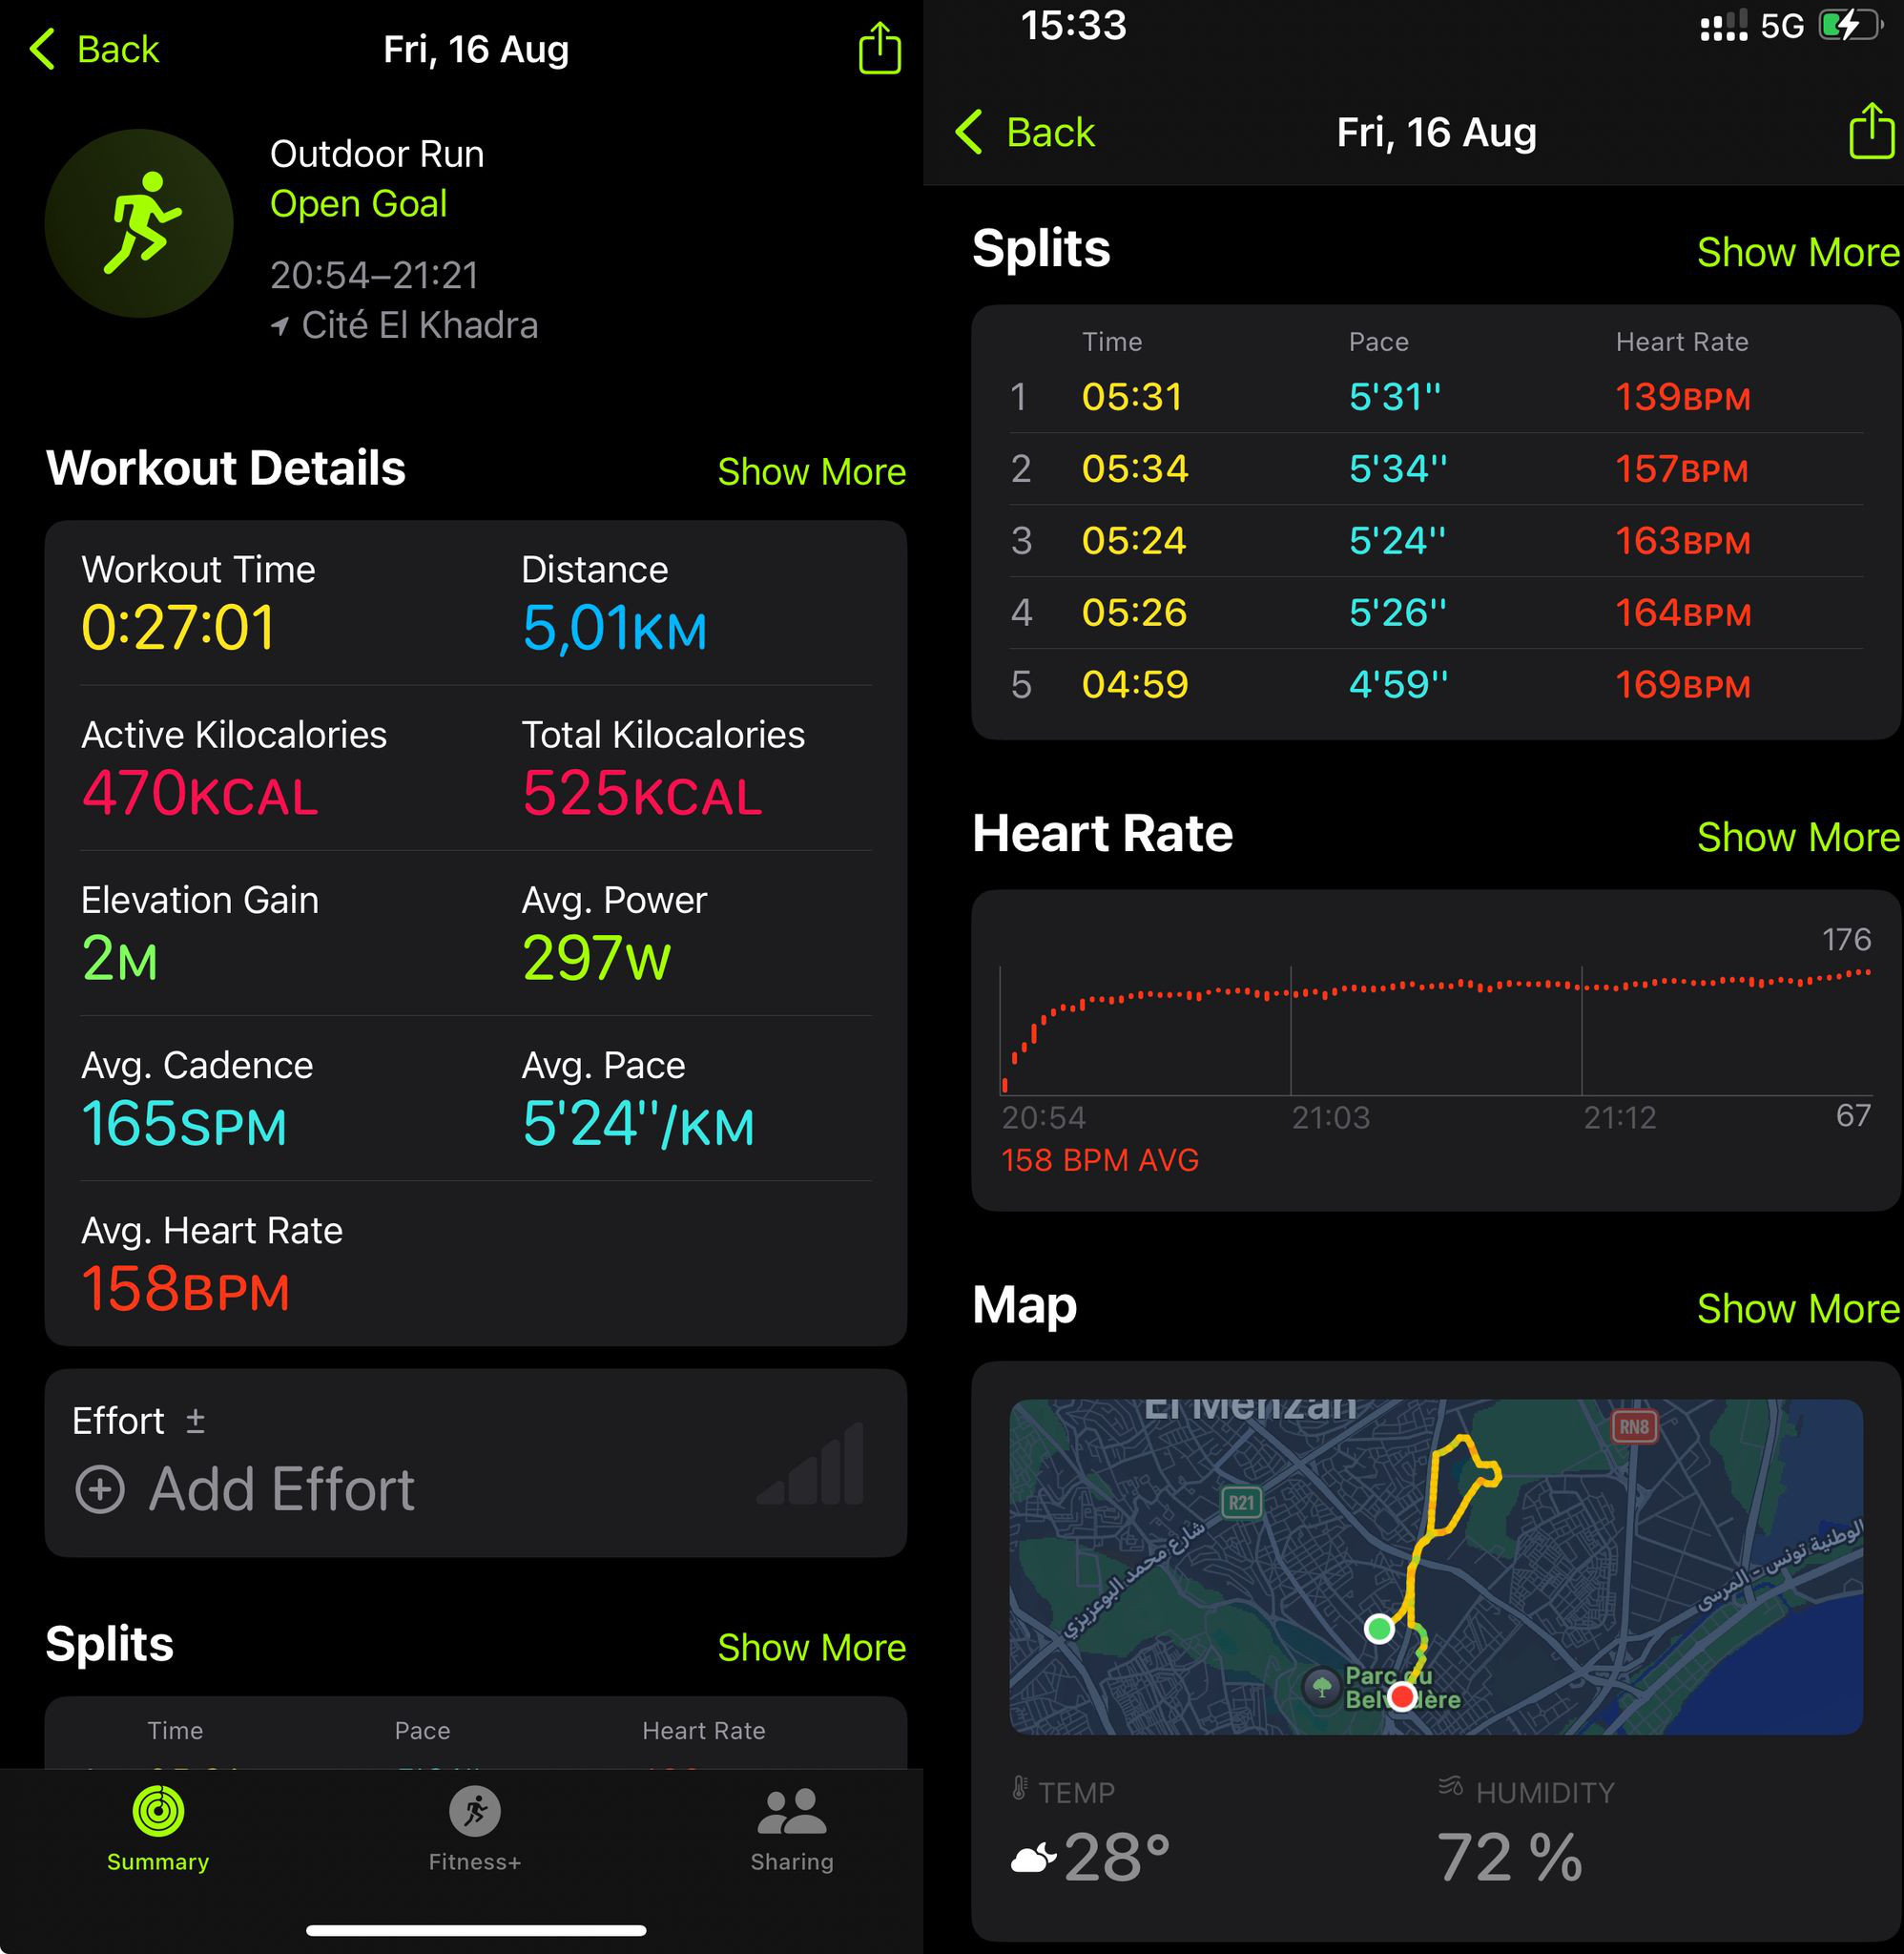
The watch also provides tons of other data on sleep quality, resting heart rate, calories burned... but there’s always been one thing that frustrates me compared to other models I’ve used in the past, like Fitbit watches: no webservice nor API for developers. And yet, I’d really like to fetch those data in order to process it with LLMs using the CWCloud low-code FaaS engine.

However, no online API doesn’t necessarily mean it’s impossible to retrieve the data: we can see that many apps on the iPhone still manage to access the watch’s data, like Strava, MyFitnessPal...

Most of the time, these apps access data directly from the iPhone using Apple’s HealthKit framework and by requesting the proper permissions in Apple’s security settings.

Still, it requires quite a bit of effort for someone who’s not an iOS mobile developer to build and validate a Swift app just to send data to a webhook. So I looked to see if someone had already done that job — and someone had, with the Health Auto Export app.

The app has pretty bad reviews, but once you read the comments, it’s clear why: people didn’t understand what it’s for. It’s not about creating pretty statistical dashboards, but about exporting Apple health data in developer-friendly formats (CSV or JSON), and scheduling those exports to external connectors (REST/HTTP webhooks, MQTT files, Dropbox...).

In our case, that’s exactly what we needed. Here’s how to configure an HTTP webhook, for instance, to send the data to CWCloud in an automation that runs every minute:

health-auto-export

Every minute, the CWCloud serverless function receives a JSON payload in the following format:

{
"data" : {
"metrics" : [
{
"units" : "count\/min",
"data" : [
{
"Min" : 79,
"date" : "2025-06-30 23:17:40 +0200",
"Avg" : 79,
"Max" : 79,
"source" : "Idriss’s Apple Watch"
},
{
"Min" : 66,
"Max" : 66,
"Avg" : 66,
"source" : "Idriss’s Apple Watch",
"date" : "2025-06-30 23:23:45 +0200"
},
{
"Max" : 66,
"date" : "2025-06-30 23:26:52 +0200",
"source" : "Idriss’s Apple Watch",
"Min" : 66,
"Avg" : 66
}
],
"name" : "heart_rate"
}
]
}
}

In the automation, you'll notice I filtered only the heart_rate metric, because otherwise it would send many others — not just from the Apple Watch, but also from apps like MyFitnessPal, which tracks your macros (kcal, proteins, fats, carbs, calcium, etc.) from your diet. So there’s a lot of room for very interesting usecases here 😁.

That been said, this payload isn’t compatible with the interface contract of our serverless engine with the standard endpoints we’ve documented in several demos, where we expect function parameters in advance.

However, there is an endpoint /v1/faas/webhook/{function_id} (or /v1/faas/webhook/{function_id}/sync if you want to receive the function’s response directly in the HTTP response). In this case, your function just needs to be defined with a single raw_data argument like this:

faas-raw-data-arg

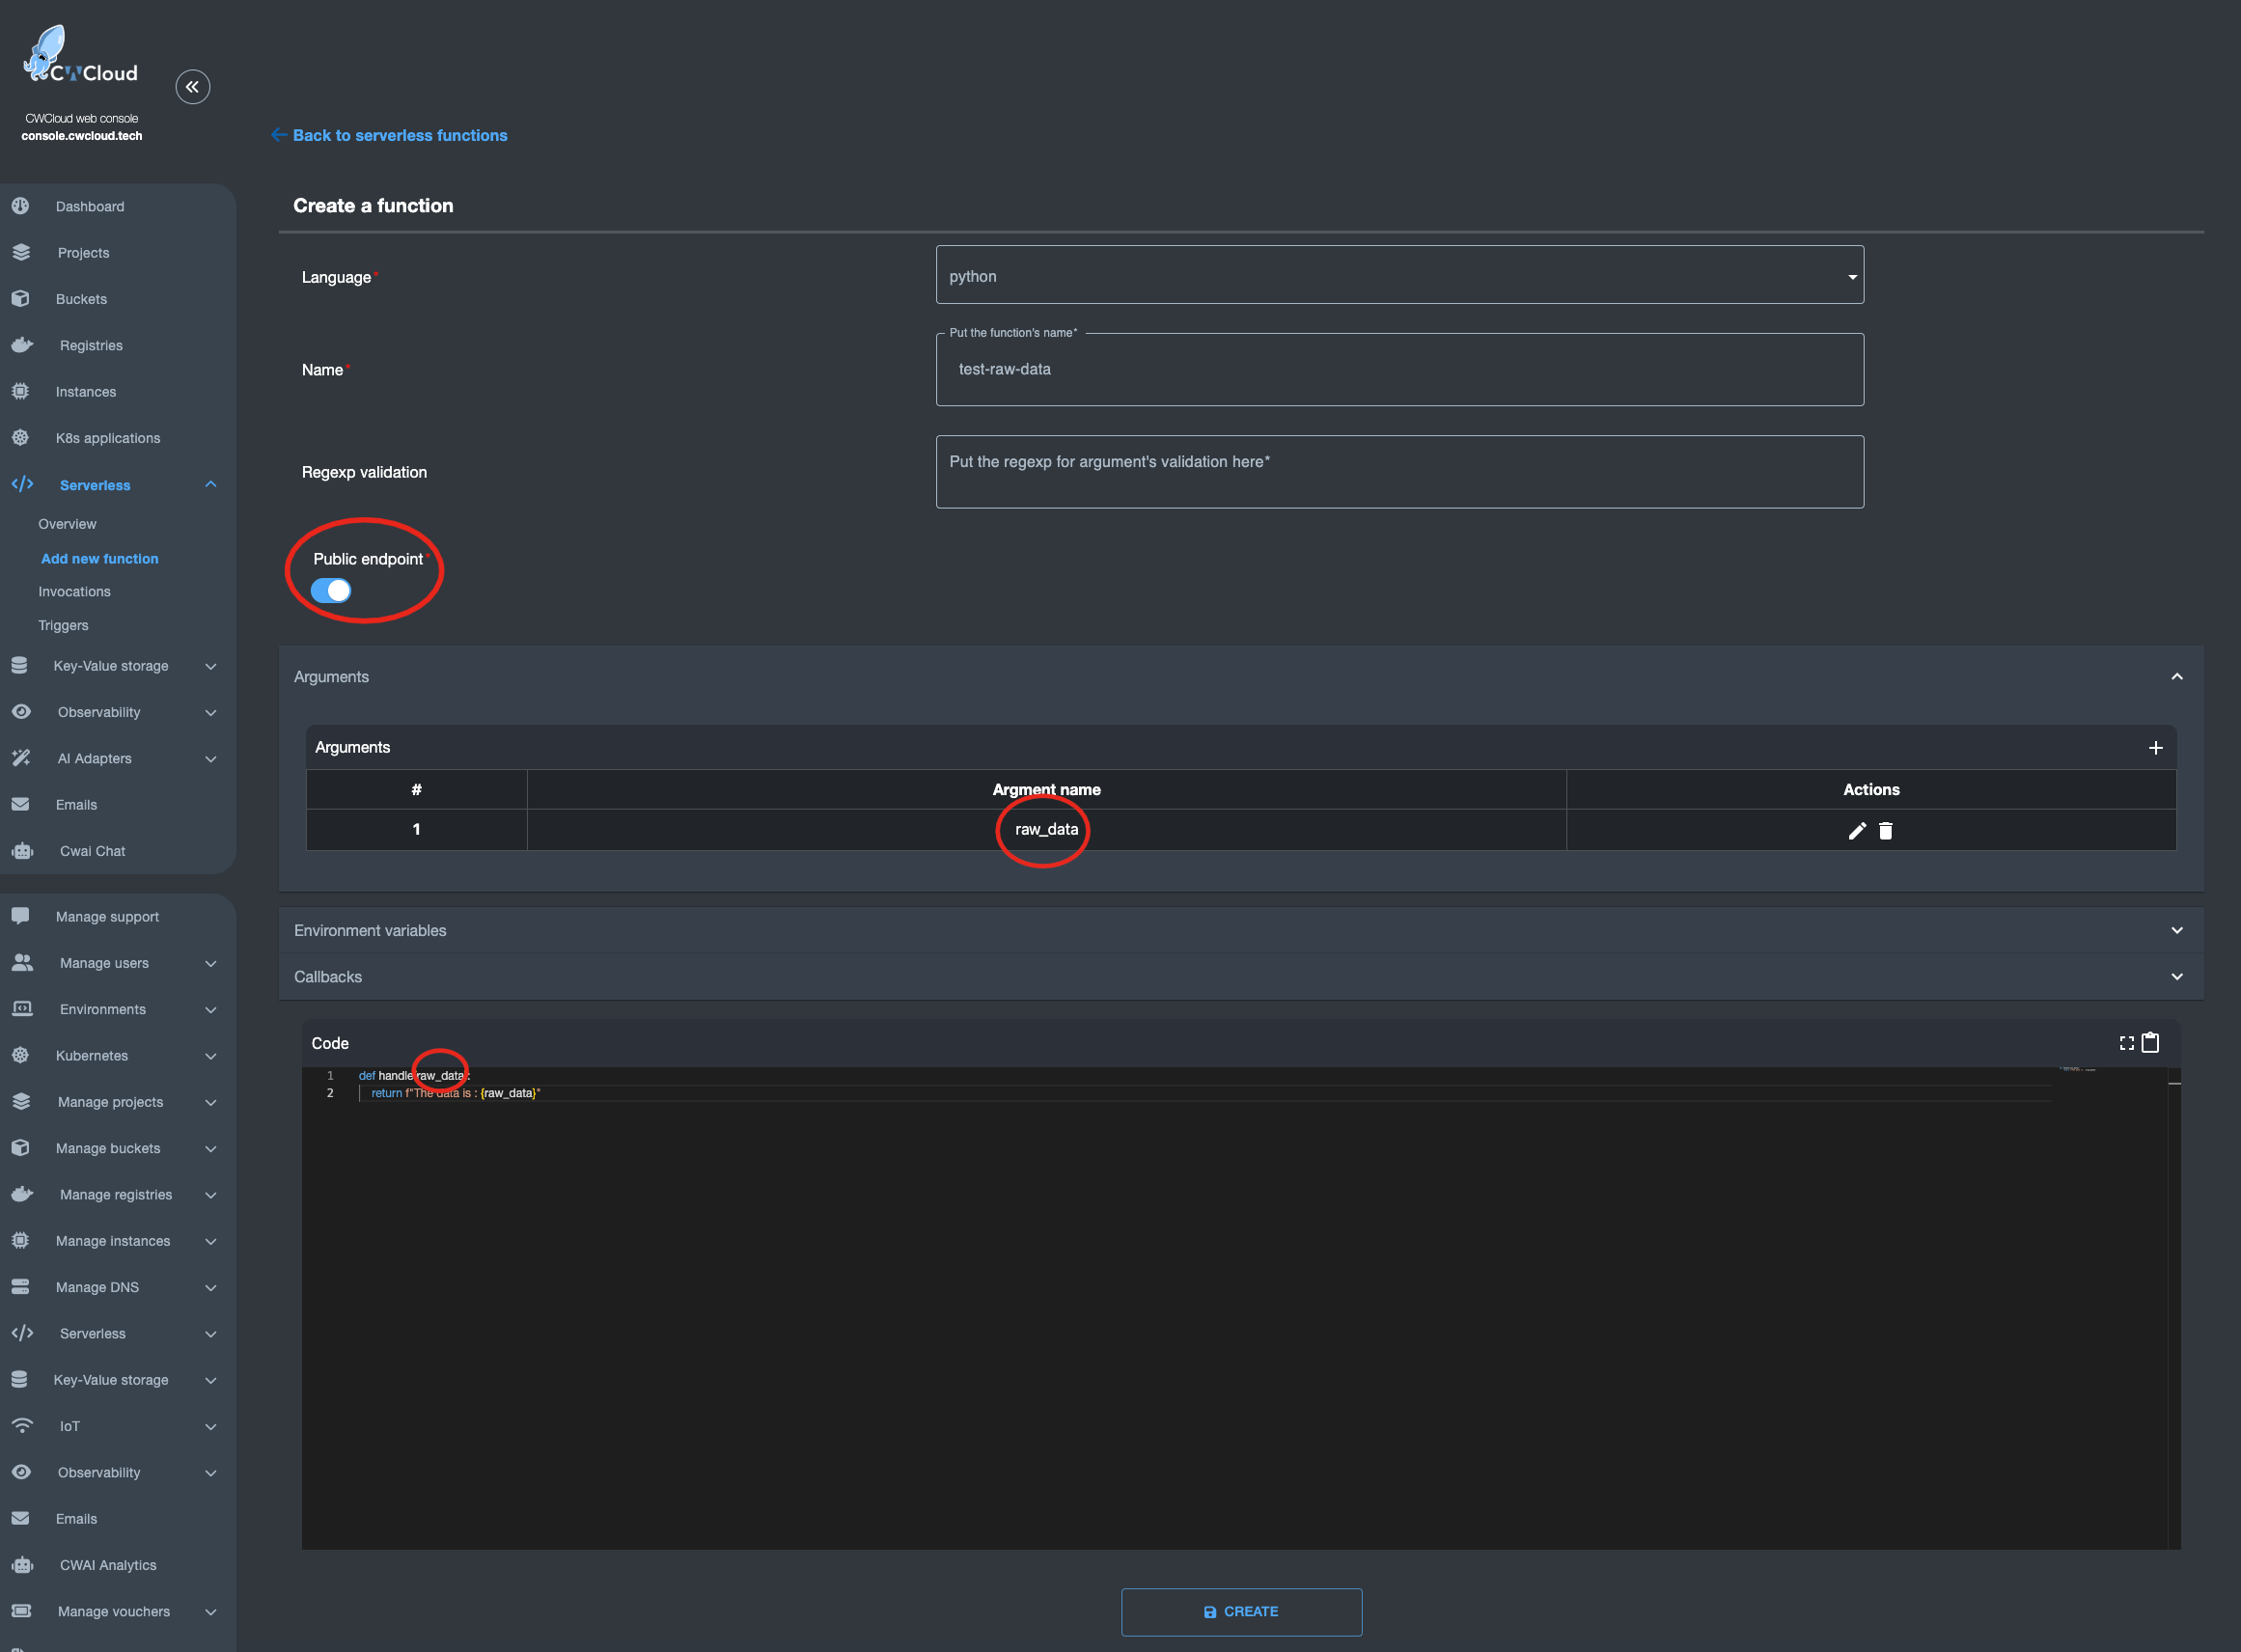
Once that’s done, it becomes very easy to invoke the function by passing whatever body you want — which you can then parse directly in your code:

$ curl "https://api.cwcloud.tech/v1/faas/webhook/ecb10330-02bf-400b-b6a8-d98107324ac3/sync" -X POST -d '{"foo":"bar"}' 2>/dev/null | jq .
{
"status": "ok",
"code": 200,
"entity": {
"id": "78774026-f75e-4c7c-850a-9b9eb2cb2ec0",
"invoker_id": 3,
"updated_at": "2025-07-05T14:39:53.119780",
"content": {
"args": [
{
"key": "raw_data",
"value": "{\"foo\":\"bar\"}"
}
],
"state": "complete",
"result": "The data is : {\"foo\":\"bar\"}\n",
"user_id": null,
"function_id": "ecb10330-02bf-400b-b6a8-d98107324ac3"
},
"created_at": "2025-07-05T14:39:52.443918"
}
}

As you’ve probably guessed, in the Health Auto Export app automation, it’s a URL like https://api.cwcloud.tech/v1/faas/webhook/{function_id} that you’ll need to define (no need for /sync at the end since you don’t care about waiting for the result).

Note: We also exposed the function as public so it could be called without authentication, but that’s not necessarily what you want. Don’t forget that you’re billed per token consumed — for example, if you use public LLMs — so you probably don’t want just anyone calling your webhook. You can totally keep the function private and add an X-User-Token header in the Health Auto Export app automation.

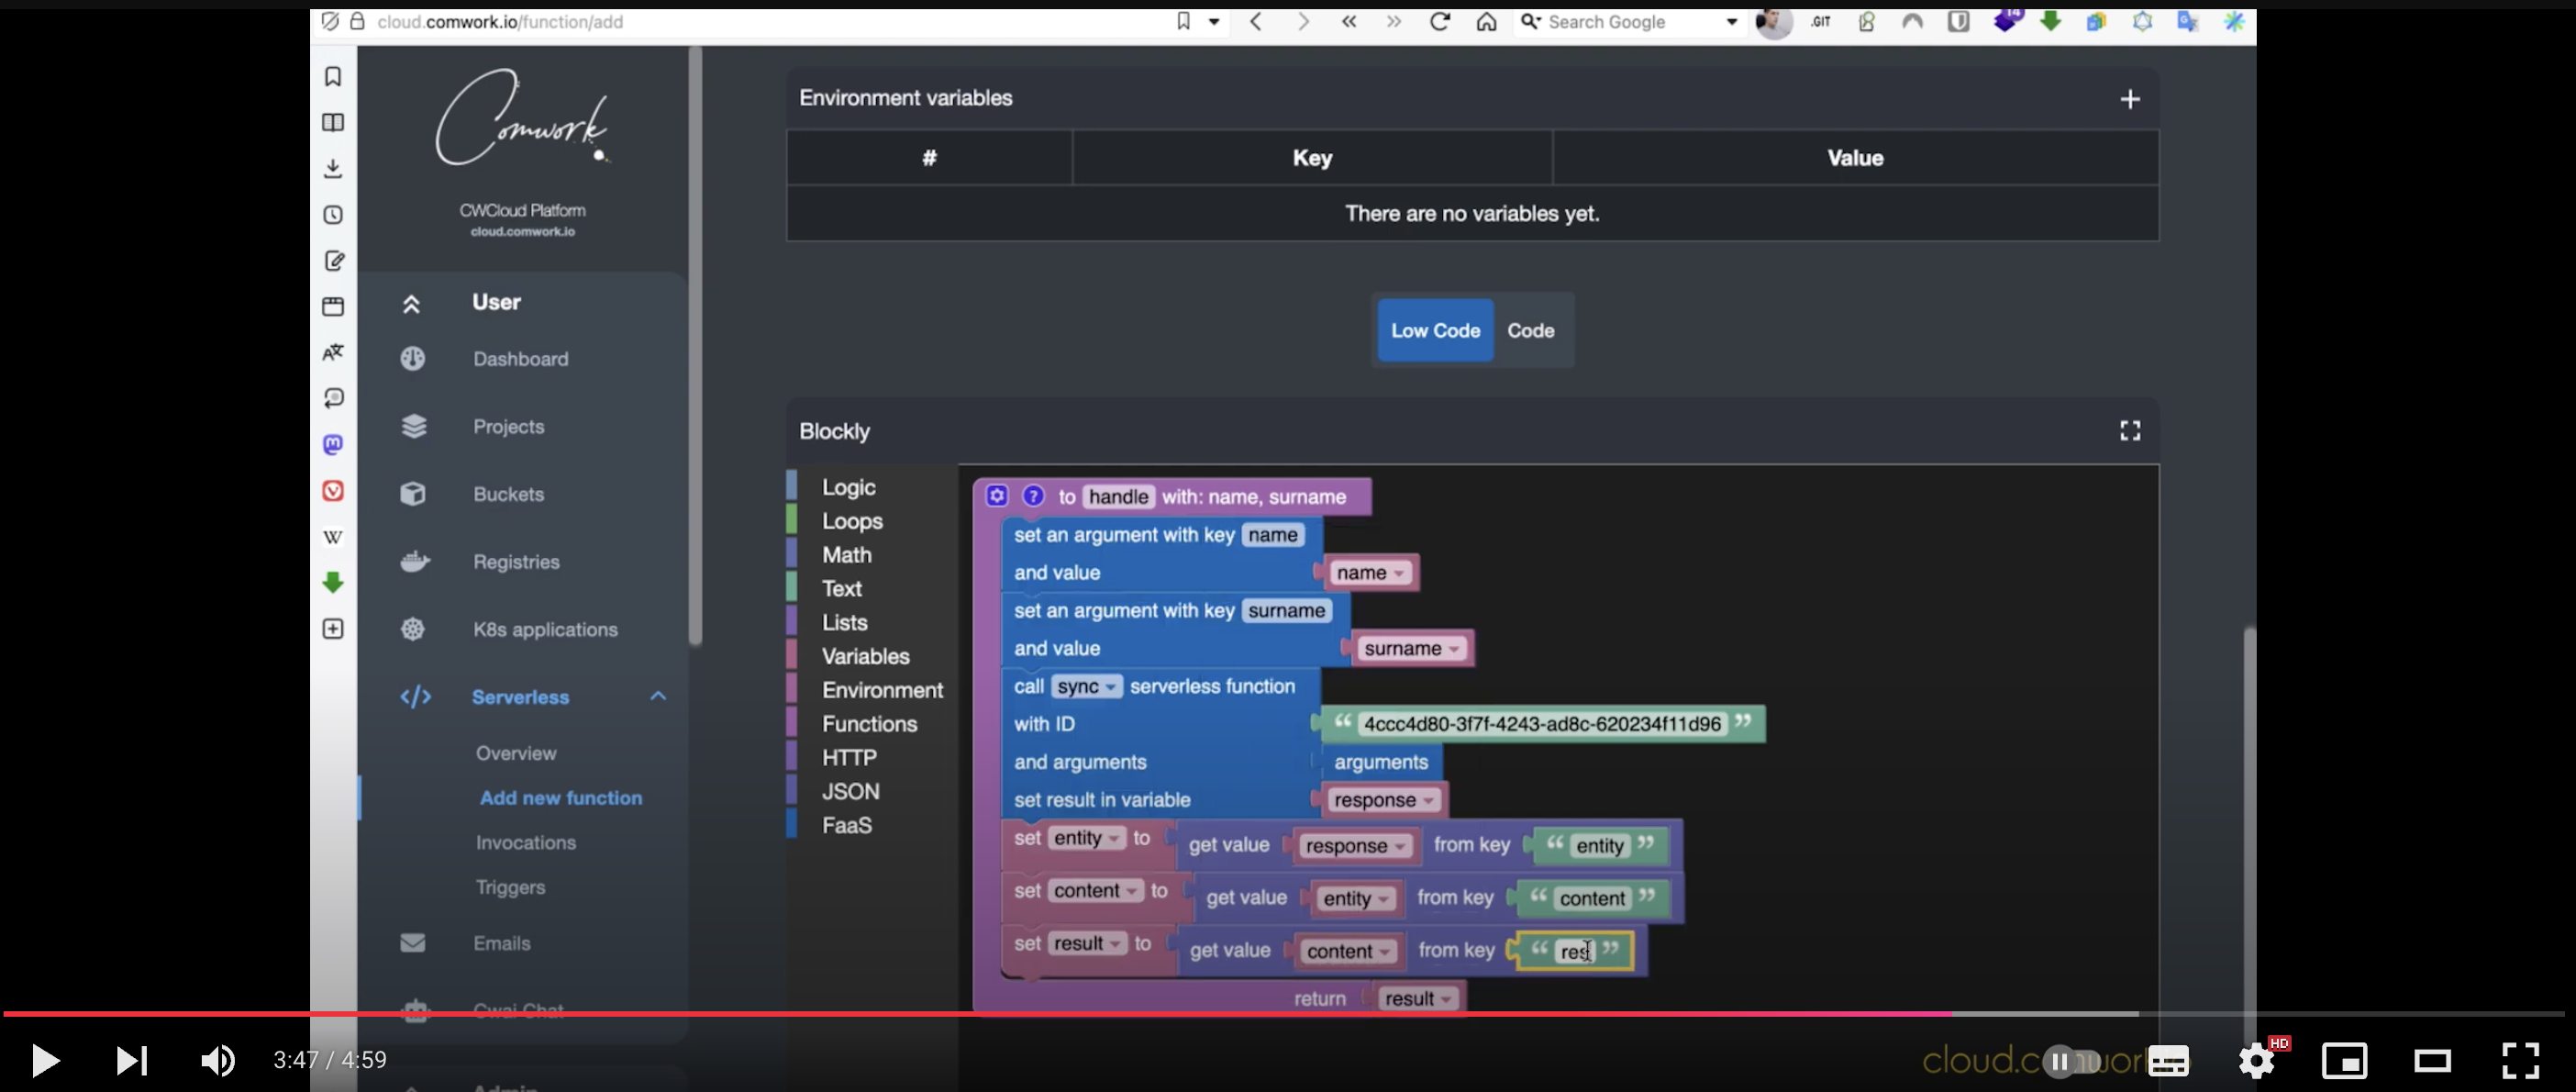
Now that we know how to create a webhook, here’s the Blockly3 code to extract the average heart rate, send it to the gpt4omini LLM. In this case, we asked the LLM to react with an emoji based on the value it receives, and send the result to Discord:

faas-blockly-heart-rate

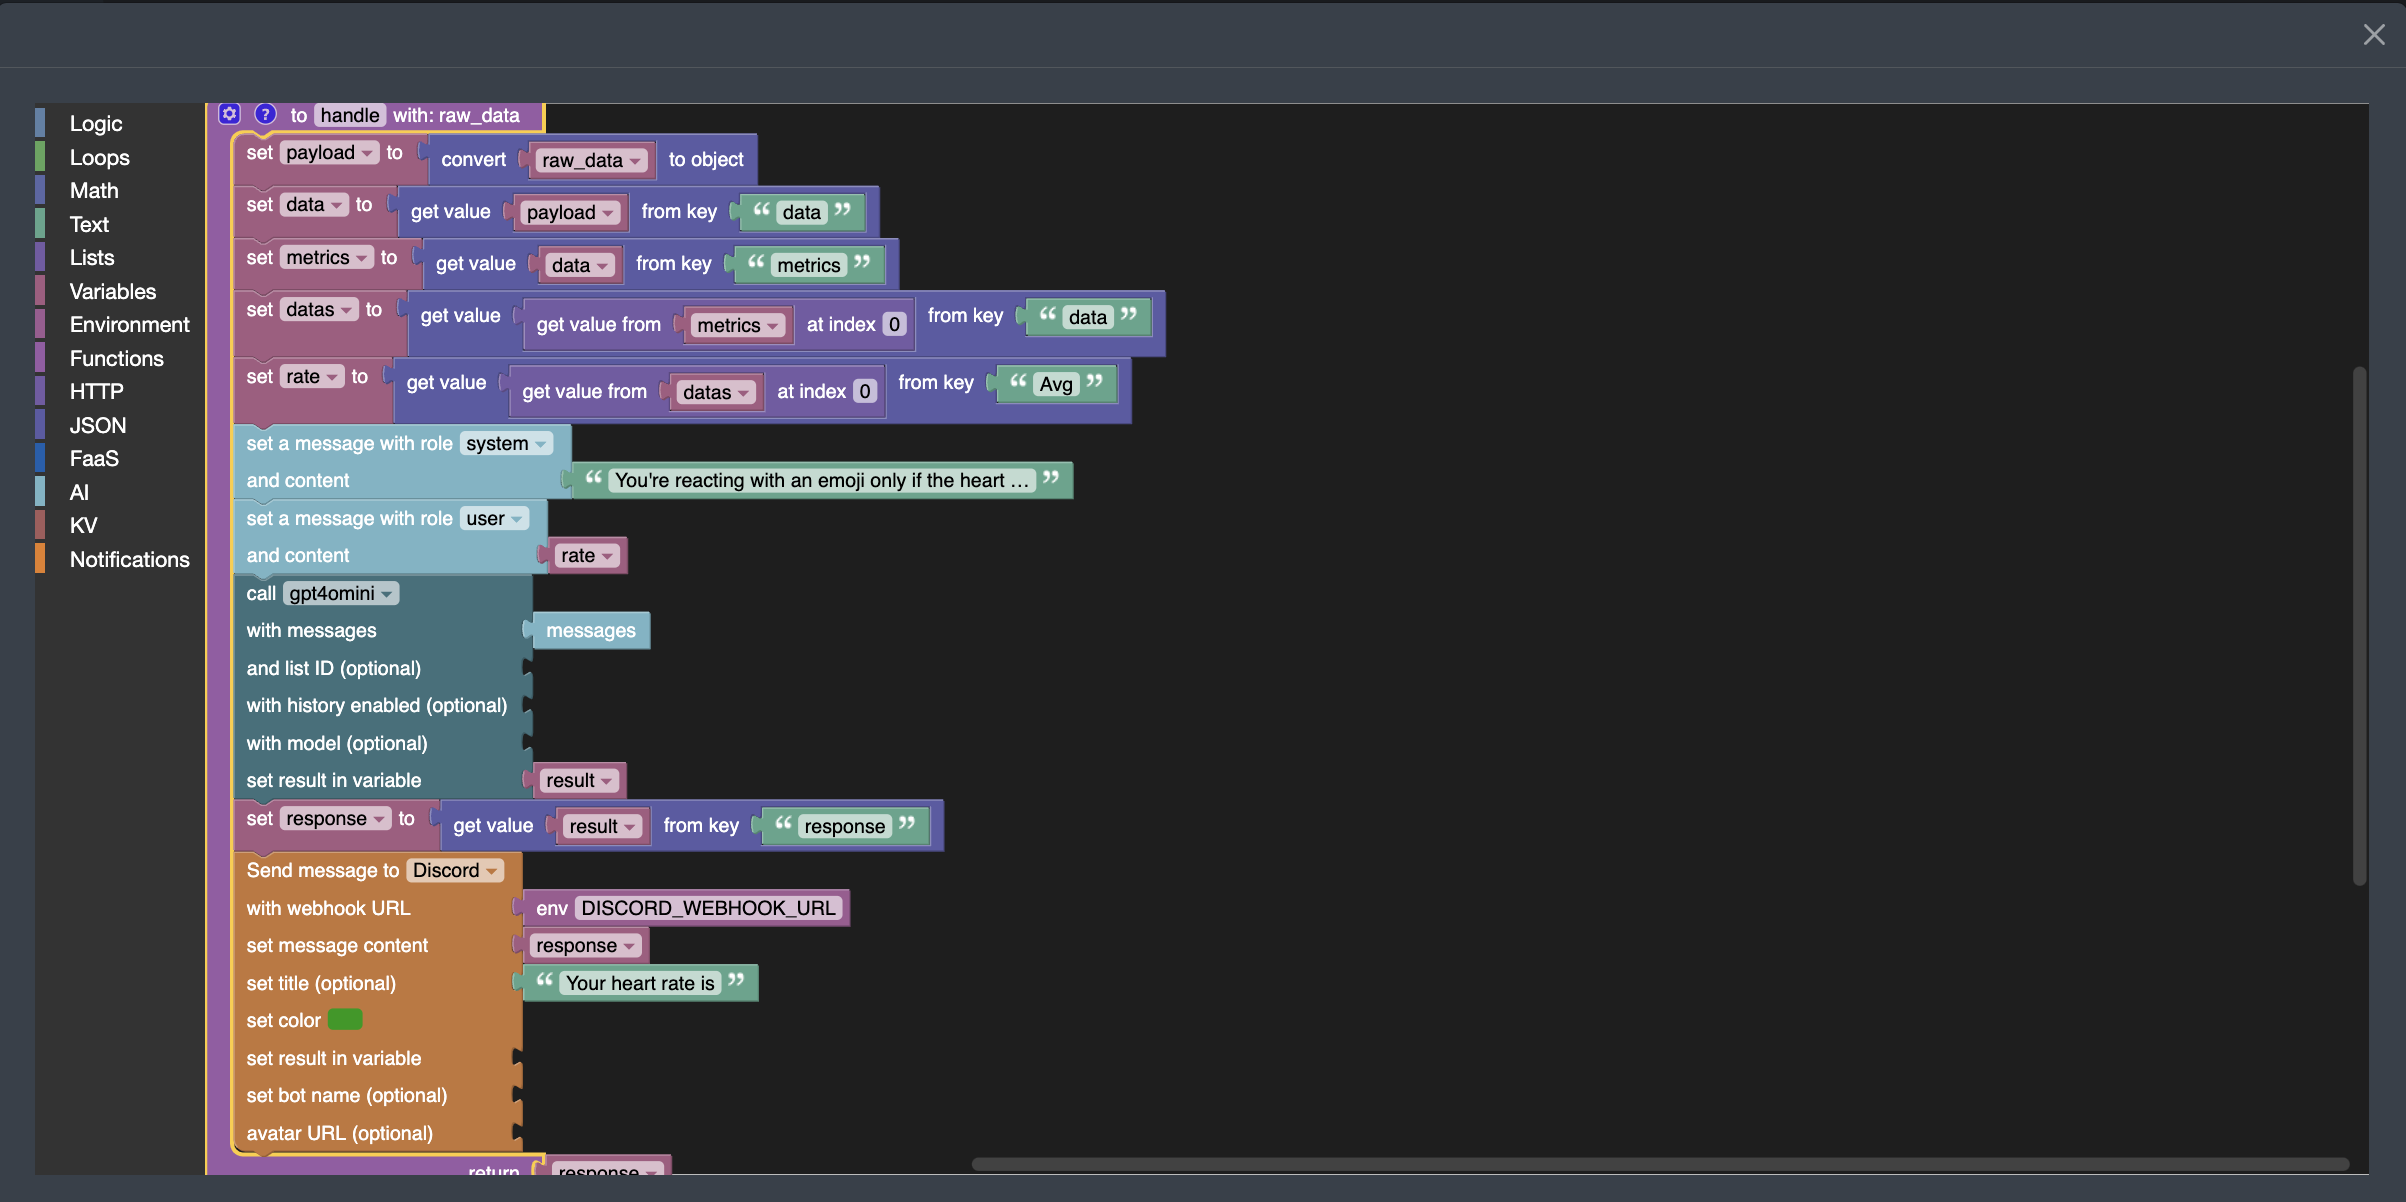
You can see that I'm passing the following sentence "You're reacting with an emoji only if the heart rate is too slow or to high" as a system prompt and the fetched heart rate metric as a user prompt.

Moreover, you should know that AI blocks require authentication to invoke the CWCloud AI API. If you want to keep this webhook open to anyone, you’ll need to create an API key following this tutorial, and inject it into an environment variable called AUTH_HEADER_VALUE like this:

faas-authentication-cwai

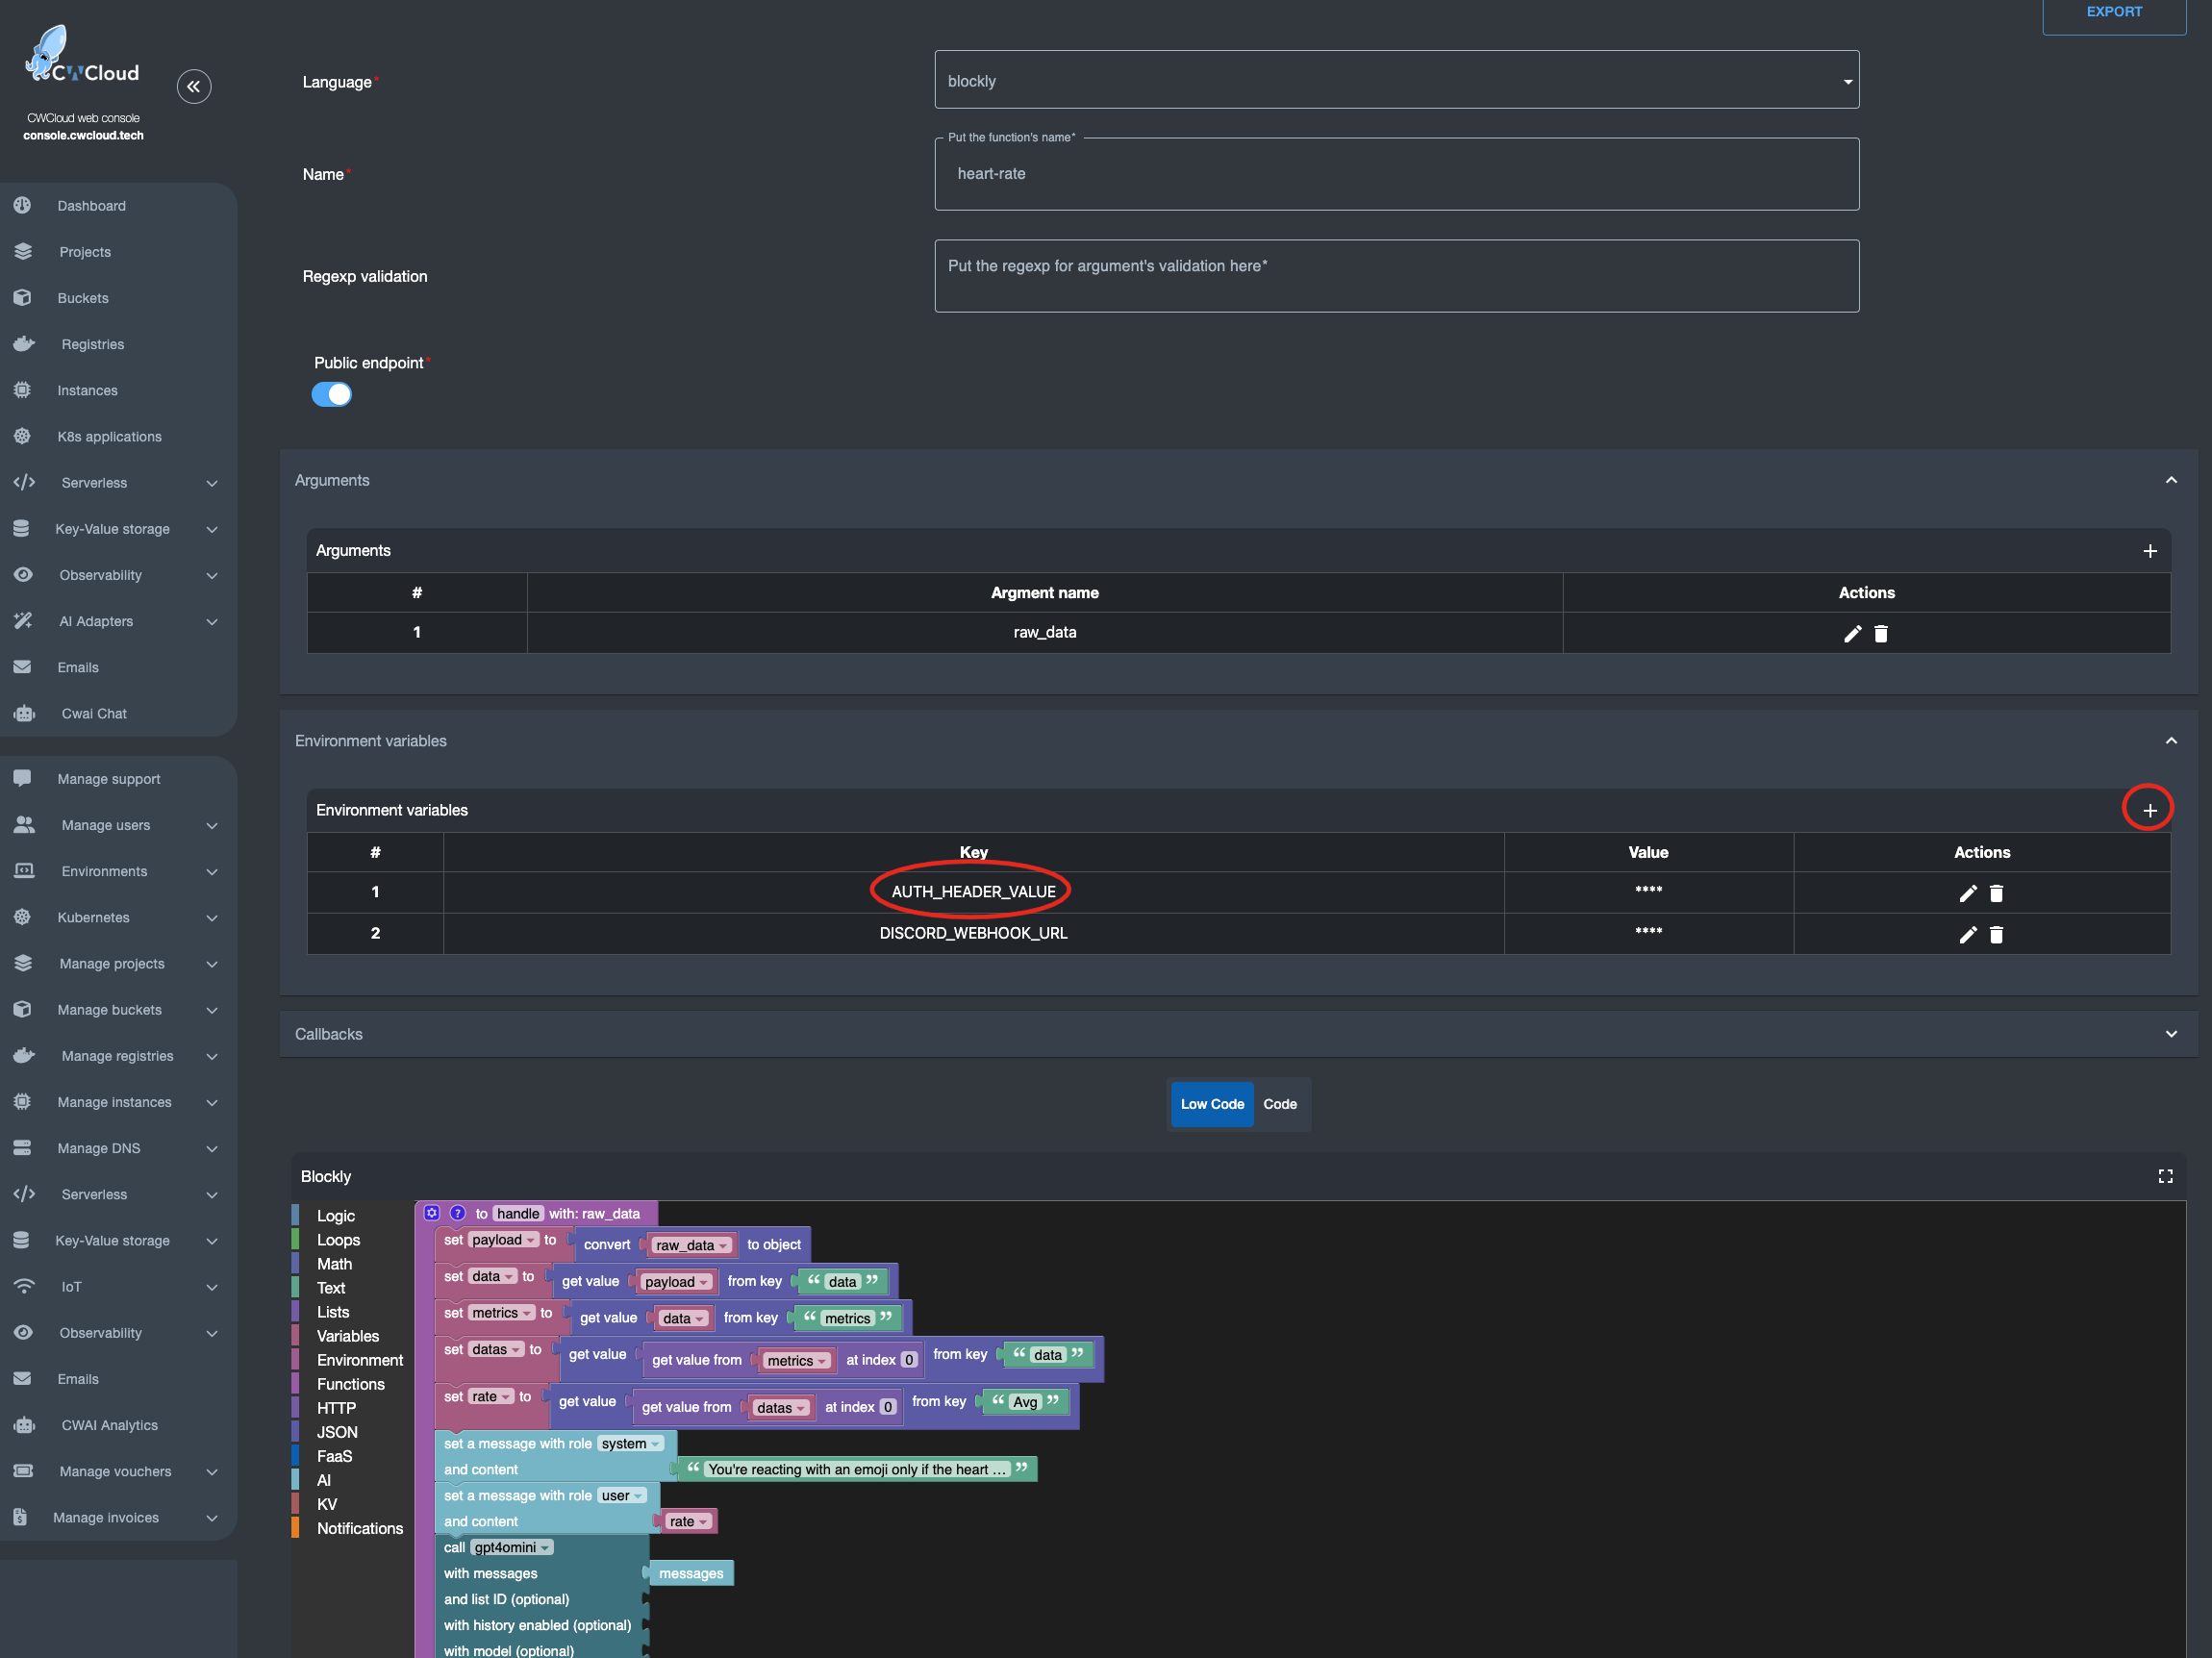
In this case, anyone is able to invoke your webhook and your account will be billed for usage in the case you’re using public AI models. You can also choose to use your own LLM hosted on your own infrastructure instead — in which case it makes more sense to keep the webhook public 😇.

Also note: if the AUTH_HEADER_VALUE variable is set, it takes priority over user authentication when calling the webhook with an authenticated request.

You can also see in the screenshot above that a Discord webhook was defined in another environment variable DISCORD_WEBHOOK_URL so it can be used to send the LLM’s response into Discord. Here’s the result:

faas-discord-heart-rate

We can see that so far, everything’s going just fine with my heart 😅

Footnotes

  1. Function as a Service

  2. Large Language Model

  3. Blockly is low-code language we're providing with CWCloud

Fork It Tunisia 2025, day summary

· 2 min read
Idriss Neumann
founder cwcloud.tech

We made it! Tunisia 🇹🇳 had his first developer and tech conference at the city of culture on the 5th of April.

forkit-tn-2025-hall

As we planned with a previous blogpost we had a beautiful booth in order to challenge attendees with a AI, serverless and IoT competition. We had lot of contenders who participated.

forkit-tn-2025-cwcloud-booth

Let's congratulate again the winners: Zayneb, Ala Eddine and Yassmine1!

forkit-tn-2025-winners

The source code of the challenge is available on github and if you want more explanation, you can watch this short video (you can enable the English subtitles):

forkit-cwcloud-challenge

I also had the chance to get on stage and talk about Quickwit, Grafana, Jaeger and OpenTelemetry with another demo. It was planned to be in English but finally the public wanted to be in French. Sorry for those who want to get an English replay, there'll be other occasions 😅

forkit-tn-2025-talk-quickwit

There will be a replay, the slides and materials are available on github as well and if you want to get more informations about it, you can read this blogpost.

I also attended the great and inspiring keynote "how do you learn" with Olivier and Sonyth Huber and recommand you to watch the replay when it will be published.

And finally I also get my speaker friend Yacine to Sidi Bou Saïd, the most beautiful place in Tunis area. Yacine who also gave an amazing conference about how he ported Doom on a web browser using WASM (WebAssembly) which is an amazing technology.

forkit-tn-2025-sidibou

Now if you want to stay in touch especially if you enjoyed the CWCloud's demo and competition, we have a community discord server you can join.

Next events for me will be DevoxxFR as an attendee, SunnyTech and RivieraDev as a speaker. I hope to see many of you there 🤩.

Footnotes

  1. Yassmine couldn't stay to get the prize so her friend took it for here 😅.

Fork It Event in Tunis

· 2 min read
Idriss Neumann
founder cwcloud.tech

As you might know we will be present in the Fork It Event which will happened in Tunis 🇹🇳 on the 5th of April.

CWCloud will have a booth with an AI, IoT and serverless challenge which will consist to read a DHT22 humidity and temperature sensor with a Raspberry Pi then send the temperature to a CWCloud serverless and lowcode function which will send it to a LLM in order to make it react with emojis. You'll get more informations with this video:

forkit-cwcloud-challenge

Note: the video is in French but you can enable the English subtitles :p

There will be prizes to win like on of the Aurélie Vache's book:

aurelie-books

I'll also present the following talk at 04:55 PM: Let's discover together the next generation of observability with logs and traces: Quickwit.

It's very important to register quickly and get your ticket here. It's not expensive at all for an event of this quality and we also got a discount code for our readers which will lower the price by 20%: COMWORK20.

In order to register, you have to click on "Get Tickets":

forkit-get-tickets

Then you have to choose one of the available currency you can use with a credit card (Euros or TND):

forkit-choose-currency

If you're using tunis.events with the TND currency, in order to add the discount code, you can click on "code secret" (which means "secret code"):

forkit-ticket-tnd

And if you're using lu.ma with the Euros currency, in order to add the discount code, you can click on "add a coupon":

forkit-ticket-euros

We hope that many of you will join us there!

New identity for CWCloud

· One min read
Idriss Neumann
founder cwcloud.tech

new-identity-cwcloud

You may have noticed that we have changed our visual identity and started separating activities. CWCloud is becoming a standalone product with its own legal structures currently in progress (until it's done, the product remains under the supervision of the company Comwork).

On this occasion, CWCloud has its own landing page, and the blog has been moved here: cwcloud.tech.

Comwork will continue to exist as a service-oriented company with its own website, which remains: comwork.io.

Many things are evolving, including the introduction of two versions: a Community Edition (open-source under the MIT license) and an Enterprise Edition (proprietary), with additional features meant for large organizations. The SaaS versions for the European/international and Tunisian markets will directly point to the Enterprise Edition.

We're also applying to YCombinator's finance program to help further develop the product. We will keep you updated on our progress.

Replace Google Analytics with Grafana, Quickwit and CWCloud

· 6 min read
Idriss Neumann
founder cwcloud.tech

Hi and Merry Christmas 🎄 (again yes, I didn't thought that I was going to publish another blogpost so soon 😄).

In this blogpost we'll see how to use CWCloud and Quickwit to setup beautiful dashboards like this in replacement of Google Analytics:

grafana-geomap-dashboard

Before going in detail, let's start to give you a bit of context of what brought us to do this transition.

First, Google Analytics ain't comply with the GDPR1. So basically it was becoming illegal to continue to use it despite it was an amazing tool to analyze our websites and application usages.

With the last case law, we started to use Matomo as a replacement and we're still providing Matomo as a Service in our CWCloud SaaS. And it worked pretty well (even if I find the UI a bit old-fashion)...

However I didn't like to maintain multiple stacks which, from my perspective, are serving the same purpose: observability. And yes web analytics should be part of it from my perspective.

I already explained why we choosed Quickwit as our observability core stack in previous blogposts:

So the idea was to use the same observability stack to track visitors data and index and display those on Grafana. And to be able to achieve this, we needed something very easy to add in our various frontend like a one-pixel image:

<img src="https://api.cwcloud.tech/v1/tracker/img/{mywebsite}" style="display: none;"></img>

As you can see, we provided it as an endpoint in CWCloud to complete the observability features and it's documented here.

This endpoint is writing a log which looks like this:

INFO:root:{"status": "ok", "type": "tracker", "time": "2024-12-20T13:46:23.358233", "host": "82.65.240.115", "user_agent": "Mozilla/5.0 (iPhone; CPU iPhone OS 18_1_1 like Mac OS X) AppleWebKit/605.1.15 (KHTML, like Gecko) Version/18.1.1 Mobile/15E148 Safari/604.1", "referrer": "https://www.cwcloud.tech/", "website": "www.cwcloud.tech", "device": "mobile", "browser": "safari", "os": "ios", "details": {"brand": "apple", "type": "iphone"}, "infos": {"status": "ok", "status_code": 200, "city": "Saint-Quentin", "region": "Hauts-de-France", "country": "France", "region_code": "HDF", "country_iso": "FR", "lookup": "FRA", "timezone": "Europe/Paris", "utc_offset": "FR", "currency": "EUR", "asn": "AS12322", "org": "Free SAS", "ip": "xx.xx.xx.xx", "network": "xx.xx.xx.0/24", "version": "IPv4", "hostname": "xx-xx-xx-xx.subs.proxad.net", "loc": "48.8534,2.3488"}, "level": "INFO", "cid": "742b7629-7a26-4bc6-bd2a-3e41bee32517"}

So at the end, it contain a JSON payload we can extract and index:

{
"status": "ok",
"type": "tracker",
"time": "2024-12-20T13:46:23.358233",
"host": "82.65.240.115",
"user_agent": "Mozilla/5.0 (iPhone; CPU iPhone OS 18_1_1 like Mac OS X) AppleWebKit/605.1.15 (KHTML, like Gecko) Version/18.1.1 Mobile/15E148 Safari/604.1",
"referrer": "https://www.cwcloud.tech/",
"website": "www.cwcloud.tech",
"device": "mobile",
"browser": "safari",
"os": "ios",
"details": {
"brand": "apple",
"type": "iphone"
},
"infos": {
"status": "ok",
"status_code": 200,
"city": "Saint-Quentin",
"region": "Hauts-de-France",
"country": "France",
"region_code": "HDF",
"country_iso": "FR",
"lookup": "FRA",
"timezone": "Europe/Paris",
"utc_offset": "FR",
"currency": "EUR",
"asn": "AS12322",
"org": "Free SAS",
"ip": "xx.xx.xx.xx",
"network": "xx.xx.xx.0/24",
"version": "IPv4",
"hostname": "xx-xx-xx-xx.subs.proxad.net",
"loc": "48.8534,2.3488"
},
"level": "INFO",
"cid": "742b7629-7a26-4bc6-bd2a-3e41bee32517"
}

So let's start by creating the Quickwit mapping:

{
"doc_mapping": {
"mode": "lenient",
"field_mappings": [
{
"name": "time",
"type": "datetime",
"fast": true,
"fast_precision": "seconds",
"indexed": true,
"input_formats": [
"rfc3339",
"unix_timestamp"
],
"output_format": "unix_timestamp_nanos",
"stored": true
},
{
"indexed": true,
"fast": true,
"name": "cid",
"type": "text",
"tokenizer": "raw"
},
{
"indexed": true,
"fast": true,
"name": "website",
"type": "text",
"tokenizer": "raw"
},
{
"indexed": true,
"fast": true,
"name": "device",
"type": "text",
"tokenizer": "raw"
},
{
"indexed": true,
"fast": true,
"name": "os",
"type": "text",
"tokenizer": "raw"
},
{
"indexed": true,
"fast": true,
"name": "browser",
"type": "text",
"tokenizer": "raw"
},
{
"indexed": true,
"fast": true,
"name": "host",
"type": "ip"
},
{
"indexed": true,
"fast": true,
"name": "hostname",
"type": "text",
"tokenizer": "raw"
},
{
"indexed": true,
"fast": true,
"name": "user_agent",
"type": "text",
"tokenizer": "raw"
},
{
"indexed": true,
"fast": true,
"name": "referrer",
"type": "text",
"tokenizer": "raw"
},
{
"indexed": true,
"fast": true,
"name": "lookup",
"type": "text",
"tokenizer": "raw"
},
{
"name": "details",
"type": "object",
"field_mappings": [
{
"indexed": true,
"fast": true,
"name": "brand",
"type": "text",
"tokenizer": "raw"
},
{
"indexed": true,
"fast": true,
"name": "type",
"type": "text",
"tokenizer": "raw"
}
]
},
{
"name": "infos",
"type": "object",
"field_mappings": [
{
"indexed": true,
"fast": true,
"name": "status",
"type": "text",
"tokenizer": "raw"
},
{
"name": "status_code",
"fast": true,
"indexed": true,
"type": "u64"
},
{
"indexed": true,
"fast": true,
"name": "city",
"type": "text",
"tokenizer": "raw"
},
{
"indexed": true,
"fast": true,
"name": "region",
"type": "text",
"tokenizer": "raw"
},
{
"indexed": true,
"fast": true,
"name": "country",
"type": "text",
"tokenizer": "raw"
},
{
"indexed": true,
"fast": true,
"name": "region_code",
"type": "text",
"tokenizer": "raw"
},
{
"indexed": true,
"fast": true,
"name": "country_iso",
"type": "text",
"tokenizer": "raw"
},
{
"indexed": true,
"fast": true,
"name": "timezone",
"type": "text",
"tokenizer": "raw"
},
{
"indexed": true,
"fast": true,
"name": "utc_offset",
"type": "text",
"tokenizer": "raw"
},
{
"indexed": true,
"fast": true,
"name": "currency",
"type": "text",
"tokenizer": "raw"
},
{
"indexed": true,
"fast": true,
"name": "asn",
"type": "text",
"tokenizer": "raw"
},
{
"indexed": true,
"fast": true,
"name": "network",
"type": "text",
"tokenizer": "raw"
},
{
"indexed": true,
"fast": true,
"name": "ip",
"type": "ip"
},
{
"indexed": true,
"fast": true,
"name": "org",
"type": "text",
"tokenizer": "raw"
},
{
"indexed": true,
"fast": true,
"name": "version",
"type": "text",
"tokenizer": "raw"
},
{
"indexed": true,
"fast": true,
"name": "loc",
"type": "text",
"tokenizer": "raw"
}
]
}
],
"timestamp_field": "time",
"max_num_partitions": 200,
"index_field_presence": true,
"store_source": false,
"tokenizers": []
},
"index_id": "analytics-v0.4",
"search_settings": {
"default_search_fields": [
"website",
"cid",
"host",
"referrer",
"infos.ip",
"infos.country",
"infos.country_iso",
"infos.city",
"infos.region_code",
"infos.timezone",
"infos.currency",
"infos.version"
]
},
"version": "0.8"
}

Note: as you can see, we moved the lookup field to the root document in order to be able to use the Geomap plugin of Grafana.

Once it's done, we can use Vector, as usual, to parse this log line with the following remap function:

remap_analytics:
inputs:
- "kubernetes_logs"
type: "remap"
source: |
.time, _ = to_unix_timestamp(.timestamp, unit: "nanoseconds")

.message = string!(.message)
.message = replace(.message, r'^[^:]*:[^:]*:', "")

.body, err = parse_json(.message)
if err != null || is_null(.body) || is_null(.body.cid) || is_null(.body.type) || .body.type != "tracker" {
abort
}

.cid = .body.cid
.website = .body.website
.browser = .body.browser
.device = .body.device
.os = .body.os
.host = .body.host
.referrer = .body.referrer
.user_agent = .body.user_agent
.infos = .body.infos
.details = .body.details

if is_string(.infos.lookup) {
.lookup = del(.infos.lookup)
}

del(.timestamp)
del(.body)
del(.message)
del(.source_type)

And then the sink2:

sinks:
analytics:
type: "http"
method: "post"
inputs: ["remap_analytics"]
encoding:
codec: "json"
framing:
method: "newline_delimited"
uri: "https://xxxx:yyyyy@quickwit.yourinstance.com:443/api/v1/analytics-v0.4/ingest"

Once it's done you'll be able to do some visualization in Grafana using the Geomap plugin:

grafana-geomap

Very nice, isn't it?

Have a nice end of year and Merry Christmas 🎄 again!

Footnotes

  1. General Data Protection Regulation, a European law you can find here

  2. A sink is an output of vector which is working like an ETL (for Extract Transform Load)

Installing CWCloud on K8S is so easy!

· 3 min read
Idriss Neumann
founder cwcloud.tech

Hi and Merry Christmas 🎄.

With all the demos we've done lately, some people asks us a way to install CWCloud easily on localhost to give it a try, especially for the serverless part.

Let's start with a quick reminder on what is CWCloud: it's an agnostic deployment accelerator platform which provides the following features:

  • DaaS or Deployment as a Service: you can checkout this tutorial to understand how DaaS is working with cwcloud and what's the difference between IaaS, PaaS and DaaS.
  • FaaS or Function as a Service: you can checkout this blogpost to understand what is the purpose of this feature
  • Observability and monitoring: you can checkout this tutorial

At the time of writing, here's the different component used by CWCloud to run:

  • A RESTful API
  • A Web GUI1
  • Some asynchronous workers to schedule run the serverless function
  • ObjectStorage
  • PostgreSQL as relational and JSON database
  • Redis for the cache and message queuing
  • Flyway DB SQL migrations

It can be seen as a bit heavy but believe me it's not, it can run on a single Raspberry PI!

In order to self-host CWCloud, we provide three ways (the three are relying on docker images):

But this is not enough to bootstap it in seconds. In this blogpost we will show you how to run CWCloud with our CLI cwc using kind2 in order to use some feature which doesn't not depends on the external services like the FaaS or the monitor features.

Just a bit of reminder, here's how to install kind, kubect and helm with brew:

brew install kubectl
brew install helm
brew install kind

Then you can also install our cwc cli using brew3:

brew tap cwc/cwc https://gitlab.comwork.io/oss/cwc/homebrew-cwc.git 
brew install cwc

Once it's done, you can create your cluster with kind:

kind create cluster

And then, simply run the following command:

cwc bootstrap

Then, wait until the pods are Running:

kubectl -n cwcloud get pods

cwcloud-pods

Then you can open port-forward to the API and GUI in order to be able to open the GUI in a web browser:

cwc bootstrap pfw

You'll be able to access the GUI through this URL: localhost:3000

cwcloud-k8s-bootstrap

The default user and password are the following:

  • Username: sre-devops@comwork.io
  • Password: cloud456

Of course if you need to override some helm configurations, you can with this command:

cwc bootstrap --values my-values.yaml

It's might be necessary if you want to configure the DaaS feature which is in a "no operation" mode by default. In order to fully use it, you'll have to follow all those configurations tutorials depending on the cloud provider you want to enable.

And finally if you want to uninstall, here's the command:

cwc bootstrap uninstall

Now I'll let you with this five minutes video tutorial on how to use the FaaS, you can fully reproduce on your local environment:

faas-tutorial-player

Enjoy!

Footnotes

  1. Graphical User Interface

  2. Of course you can replace kind, by something equivalent like k3d or minikube as you wish.

  3. We also provide other way to install our cli if you don't have brew available on your operating system, you can refer to this tutorial. We're supporting Linux, MacOS and Windows for both amd64 and arm64 architectures.

Fork IT first meeting in Tunisia

· 2 min read
Ayoub Abidi
full-stack developer

On September 24th, 2024, CWCloud proudly hosted the first-ever Fork It Community Meetup in Tunisia, marking the first Fork It community event in Africa.

Fork It, a growing community of web development and UX enthusiasts, chose CWCloud's office in Tunis, as the venue for a day dedicated to knowledge sharing, insightful discussions, and networking.

forkit-meetup-09-2024

The event featured two captivating conferences by esteemed speakers:

  • Idriss Neumann delivered a talk on "Deployment as a Service (DaaS)", showcasing how to transform infrastructure as code into a functional API and product.
  • Sofiane Boukhris then shared his expertise on "Designing Effectively: Mastering Time, Cost, and Value", providing practical insights into project management and optimization.

Between the sessions, attendees enjoyed opportunities to network and discuss their experiences over a relaxed cocktail hour.

The event was a huge success, thanks in part to the invaluable support of sponsors CWCloud and CamelStudio.

CWCloud, a leading service company in application development, cloud deployment automation, and production infrastructure outsourcing, was thrilled to host this milestone event.

By supporting such initiatives, CWCloud continues to strengthen its role in building a more connected and collaborative tech community.

You can watch the full conference here (in French):

forkit-replay-09-2024

Stay tuned for more exciting events and collaborations from CWCloud and the Fork It community!

CWCloud deep dive with OVHCloud

· 2 min read
Ayoub Abidi
full-stack developer

Recently, CWCloud collaborated with OVHCloud for an insightful event titled "Sous le capot de Comwork.io1" (Under the Hood of Comwork.io), where °°Idriss Neumann__, CEO and founder of CWCloud, and Thierry Chantier, Developer Relations at OVHCloud, shared an in-depth look into Comwork's cloud journey and platform evolution.

During this event, Idriss walked the audience through the genesis of CWCloud, highlighting how the platform has grown since its inception and how it leverages cloud technologies to optimize workflows and enhance efficiency. He also unveiled some exciting insights into how the teams operate, providing a behind-the-scenes look at their development process.

One of the key points of the event was Idriss's vision of a unified toolset for cloud environments, addressing the complexities of working across different cloud providers. He emphasized the importance of creating solutions that streamline deployment automation and infrastructure management, reflecting Comwork's mission to simplify cloud operations.

To cap off the event, Idriss shared an exclusive feature of OVHCloud that is unique on the global stage, giving the audience a sneak peek into cutting-edge cloud capabilities that could reshape the future of cloud services.

This collaboration between CWCloud and OVHCloud not only showcased CWCloud's innovative use of cloud infrastructure but also demonstrated the shared commitment to driving digital transformation in the cloud ecosystem.

You can watch the full event here (in French):

ovh-live-meetup-06-2023

Stay tuned for more exciting collaborations and innovations from Comwork and OVHCloud!

Footnotes

  1. Comwork cloud has been renamed CWCloud since, more information here