CWClock CLI
We provide an OpenSource1 CLI for CWClock. You can use it to record your time using a terminal and more.
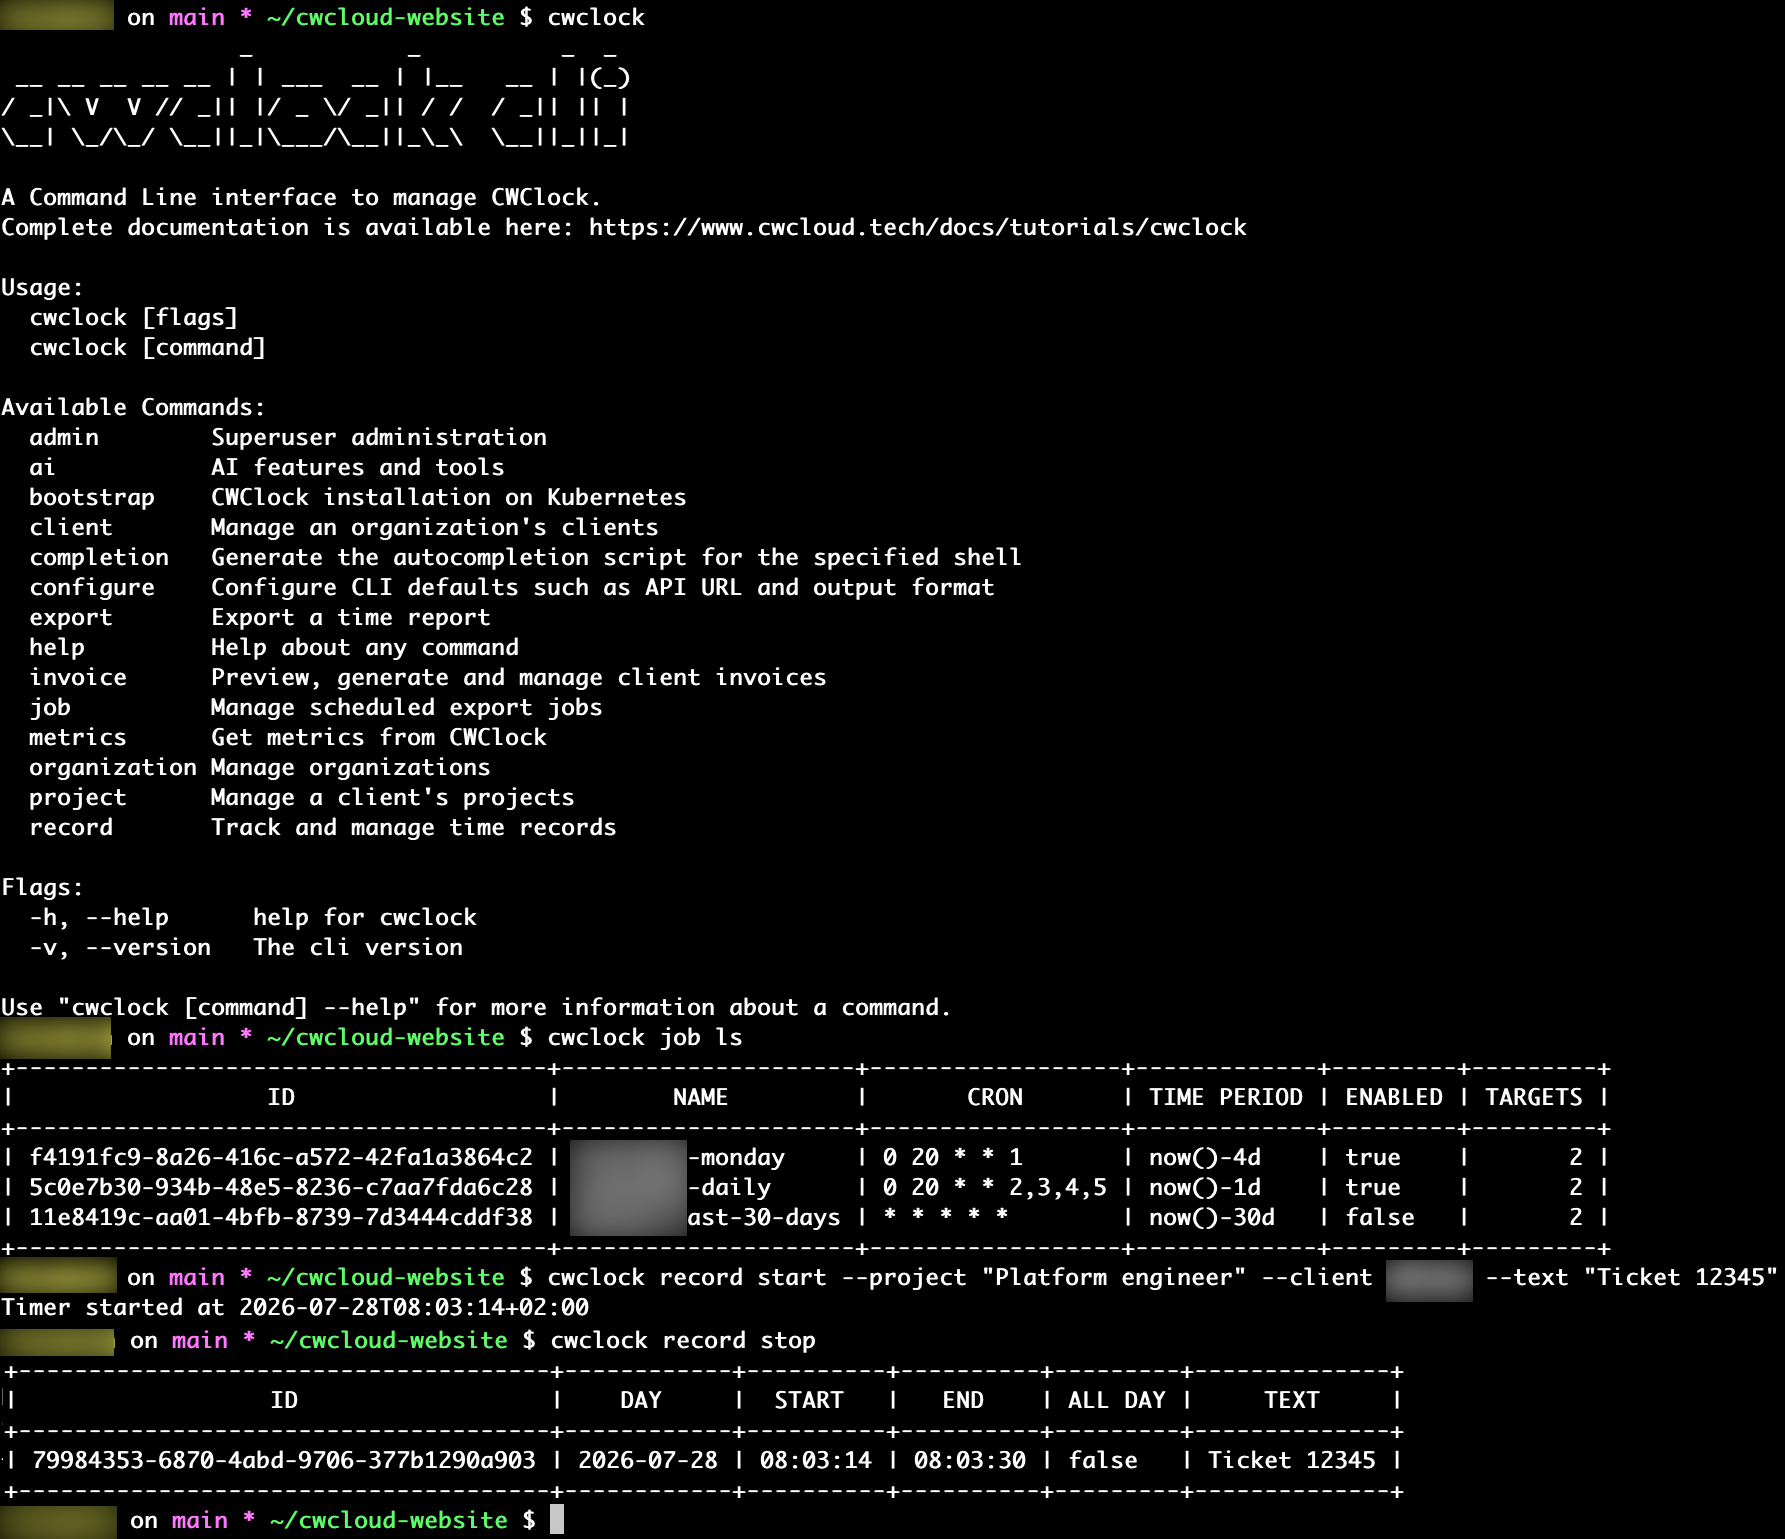
Installation
Choose the installation mode that suits your operating system and follow the instructions.
Homebrew
First installation:
brew tap cwclock/cwclock https://gitlab.cwcloud.tech/oss/cwclock.git
brew trust --formula cwclock/cwclock/cwclock
brew install cwclock
Upgrade:
brew update
brew upgrade cwclock
Curl
Linux
Linux x86 (64 bit)
version="1.13.8"
curl -L "https://gitlab.cwcloud.tech/oss/cwclock/-/releases/v${version}/downloads/cwclock/cwclock_${version}_linux_amd64.tar.gz" -o "cwclock_cli.tar.gz"
mkdir cwclock_cli && tar -xf cwclock_cli.tar.gz -C cwclock_cli
sudo ./cwclock_cli/install.sh
Beware of checking if the version is available in the releases because we only keep the 5 last builds.
Linux arm (64 bit)
version="1.13.8"
curl -L "https://gitlab.cwcloud.tech/oss/cwclock/-/releases/v${version}/downloads/cwclock/cwclock_${version}_linux_arm64.tar.gz" -o "cwclock_cli.tar.gz"
mkdir cwclock_cli && tar -xf cwclock_cli.tar.gz -C cwclock_cli
sudo ./cwclock_cli/install.sh
Beware of checking if the version is available in the releases because we only keep the 5 last builds.
MacOS
MacOS x86/arm (64 bit)
version="1.13.8"
curl -L "https://gitlab.cwcloud.tech/oss/cwclock/-/releases/v${version}/downloads/cwclock/cwclock_${version}_darwin_all.tar.gz" -o "cwclock_cli.tar.gz"
mkdir cwclock_cli && tar -xf cwclock_cli.tar.gz -C cwclock_cli
sudo ./cwclock_cli/install.sh
Beware of checking if the version is available in the releases because we only keep the 5 last builds.
Windows
Direct download
You can directly download from here. Choose the right architecture (amd64 or arm64), download, unzip and you'll find an exe file there.
Windows x86 (64 bit) with Powershell
$version = "1.13.8"
$user = "YOUR_USER"
cd "C:\Users\${user}"
Invoke-WebRequest -Uri "https://gitlab.cwcloud.tech/oss/cwclock/-/releases/v${version}/downloads/cwclock/cwclock_${version}_windows_amd64.zip" -OutFile "cwclock_cli.zip"
Expand-Archive -Path "cwclock_cli.zip" -DestinationPath "cwclock_cli" -Force
Set-Location "cwclock_cli"
.\cwclock.exe
Beware of checking if the version is available in the releases because we only keep the 5 last builds.
Windows arm (64 bit) with Powershell
$version = "1.13.8"
$user = "YOUR_USER"
cd "C:\Users\${user}"
Invoke-WebRequest -Uri "https://gitlab.cwcloud.tech/oss/cwclock/-/releases/v${version}/downloads/cwclock/cwclock_${version}_windows_arm64.zip" -OutFile "cwclock_cli.zip"
Expand-Archive -Path "cwclock_cli.zip" -DestinationPath "cwclock_cli" -Force
Set-Location "cwclock_cli"
.\cwclock.exe
Installation of cwclock using the CLI
cwclock bootstrap
Available flags:
-ror--release: Release name for deployment (default:cwclock)-nor--namespace: Namespace to use for deployment (default:cwclock)-kor--keep-dir: Keep the local helm directory-dor--recreate-ns: Recreate the namespace-oor--openshift: Use openshift cli instead of kubectl-por--value: Values to override configurations (can be repeated)--directory: Change the directory folder location (usefull if you want to use your own helm templates)--kind-cluster: Specify the kind cluster to use (it'll be recreated even if it already exists)
Example:
cwclock bootstrap -r my-release -n production --value key=value --value values-override.yaml
Open tunnels
cwclock bootstrap pfw
Opens tunnels (or port forward) to the different services.
You can override the configuration like this:
cwclock bootstrap pfw --config my-pfw-config.yml
Expected YAML configuration format:
---
pfwConfigs:
  - name: "cwclock-api"
    port: 8080
    targetPort: 8080
  - name: "cwclock-ui"
    port: 3000
    targetPort: 3000
Configuration
cwclock configure
cwclock configure set format pretty
cwclock configure set api_url https://api.cwclock.me
cwclock configure set api_key <your api key>
Note: it's also possible to use environment variables QWCTL_{VAR_NAME} instead of this configuration file. For example, for the output format you can set QWCTL_FORMAT environment variable to json or pretty.
Organizations
List, create, update and delete organizations.
cwclock organization ls
cwclock organization create --name "Acme Corp" --country FR
cwclock organization update -i <organization id> --name "New name"
cwclock organization delete -i <organization id>
Available flags for create (and the same fields for update, all optional there):
--name: Organization name (required on create)--country: Country code (required on create)--address,--city,--postal-code: Address fields--currency: Currency code--identification-number,--naf,--siren,--siret,--vat-number,--mf: Registration/tax identifiers--iban,--bic: Banking details--accounting-email: Accounting email, cc'd on invoice emails-for--format: Output format override:prettyorjson
External connections
Organizations can push scheduled exports and invoices to external storage (s3, google_drive or git). List, create or delete an organization's connections:
cwclock organization connection ls -i <organization id>
cwclock organization connection -i <organization id> --type s3 --bucket-name my-bucket --endpoint https://s3.example.com --access-key <key> --secret-key <secret> --region eu-west-1
cwclock organization connection -i <organization id> --offset 0
-ior--id: Organization ID (required)--type: Connection type to create:s3,google_driveorgit--offset: Offset of the connection to delete, as shown byls(default-1)--path: Optional destination subfolder--flat-directory: Upload directly at the destination root instead of nesting underYYYY/MM- S3:
--bucket-name,--endpoint,--access-key,--secret-key,--region - Google Drive:
--folder-id,--service-account-base64 - Git:
--repo-url,--username,--password,--ssh-private-key,--ssh-private-key-passphrase
Clients
List, create, update and delete an organization's clients.
cwclock client ls
cwclock client create --name "Client A" --country FR --daily-rate 500
cwclock client update -i <client id> --email billing@client.com
cwclock client delete -i <client id>
--name: Client name (required on create)--country: Country code (required on create)--email,--contact-name,--address,--city,--postal-code: Contact details--daily-rate,--hours-per-day: Billing defaults (hours per day defaults to 7 server-side when omitted)--vat-rate,--vat-number,--vat-discharge-motive: VAT settings (VAT rate defaults to 20 server-side when omitted)--identification-number,--naf,--mf,--siren,--siret: Registration identifiers--purchase-order: Purchase order--invoice-emails: Comma/semicolon-separated invoice recipient emails--send-reports-with-invoice: Attach time reports to invoice emails sent to this client-oor--org: Organization ID or name (overrides configuredorg_id)-for--format: Output format override:prettyorjson
Projects
List, create, update and delete a client's projects.
cwclock project ls
cwclock project ls -c <client id or name>
cwclock project create --name "Website revamp" -c <client id or name> --daily-rate 450 --color "#3b82f6"
cwclock project update -i <project id> --subdivisions "backend,frontend"
cwclock project delete -i <project id>
-cor--client: Client ID or name (required on create; reassigns the project on update; filters onls)--name: Project name (required on create)--daily-rate: Daily rate--color: Project color--subdivisions: Comma-separated list of subdivisions-oor--org: Organization ID or name (overrides configuredorg_id)-for--format: Output format override:prettyorjson
Time records
Track time with a timer, or record a range directly.
cwclock record start -p <project id or name>
cwclock record stop
cwclock record create --begin "now()-1h" --end "now()" -p <project id>
cwclock record create --from 2024-01-15T09:00:00 --to 2024-01-15T12:00:00 -t 'meeting' -p <project id>
cwclock record create --all-day --begin 2024-01-15 -p <project id>
cwclock record ls
cwclock record ls --max 50
cwclock record delete -i <record id>
-por--project: Project ID or name (required forstart/create); its client is looked up automatically unless-c/--clientoverrides it-tor--text: Time record description (defaults to the project's name; onstop, overrides the text given atstart)--begin/--from,--end/--to: Range forcreate— ISO-8601 (a bareYYYY-MM-DDdefaults to00:00:00/23:59:59), or anow()/now()-1h/now()-1dstyle expression--all-day: Create a whole-day record for the date given by--begin/--frominstead of a specific range (--end/--tomust be omitted)--max: Maximum number of records to display withls(default10)-oor--org: Organization ID or name (overrides configuredorg_id)-for--format: Output format override:prettyorjson
Export
Download a summary or detailed time report as a PDF or CSV file over a date range, optionally filtered to one or more clients/projects (everything is included when omitted).
cwclock export --client <client uuid> --begin 2024-01-15T09:00:00 --end 2024-01-15T12:00:00
cwclock export --type detailed --file-format csv --client <id1> --client <id2> --project <id3> --begin now()-30d --end "now()"
--type: Report type:summaryordetailed(defaultsummary)--file-format: File format:pdforcsv(defaultpdf)-cor--client: Client ID or name filter (repeatable; every client is included when omitted)-por--project: Project ID or name filter (repeatable; every project is included when omitted)--begin: Begin date/time: ISO-8601 ornow()/now()-1h/now()-1dstyle expression (required)--end/--to: End date/time: ISO-8601 ornow()/now()-1h/now()-1dstyle expression-oor--output: Output file path (defaults to the server-provided filename, or<type>.<file-format>in the current directory)--org: Organization ID or name (overrides configuredorg_id)
Invoices
Preview, generate, send, upload and delete client invoices.
cwclock invoice preview --client <client uuid> --begin 2024-01-15T09:00:00 --end 2024-01-15T12:00:00
cwclock invoice generate --client <client uuid> --begin 2024-01-15T09:00:00 --to 2024-01-15T12:00:00
cwclock invoice send -i <invoice id>
cwclock invoice upload -i <invoice id>
cwclock invoice delete -i <invoice id>
Notes:
previewrenders the PDF without saving anything server-side, so you can check it before generating a real one;generatesaves it under its own invoice number and streams the same PDF back-cor--client: Client ID or name, forpreview/generate(required)-por--project: Project ID or name to include, forpreview/generate(repeatable; empty = every project)--begin,--end/--to: Date/time range, forpreview/generate(same formats as Export)-oor--output: Output file path, forpreview/generate(defaults to the server-provided filename in the current directory)sendemails an already-generated invoice's PDF to its client's invoice recipientsuploadpushes an already-generated invoice's PDF to every one of its organization's external connections again (e.g. after fixing a connection's credentials)-ior--id: Invoice ID or number, fordelete/send/upload--org: Organization ID or name (overrides configuredorg_id)
Scheduled export jobs
Automate recurring exports (and, optionally, invoice deliveries) on a cron schedule.
cwclock job ls
cwclock job create --name "Monthly summary" --cron "0 6 1 * *" --time-period "now()-30d" --report-types summary-pdf,detailed-csv --type email --to accounting@client.com
cwclock job update -i <job id> --enabled=false
cwclock job run -i <job id>
cwclock job delete -i <job id>
--name: Job name (required on create)--cron: Cron expression (required on create)--time-period: Time period covered by each run (required on create), e.g.now(),now()-1d,now()-1h--report-types: Comma-separated report types (required on create):summary-pdf,summary-csv,detailed-pdf,detailed-csv,unpaid-invoices,all-invoices--enabled: Whether the job is enabled (defaulttrue)--include-financial: Include financial figures in the exported reports-cor--client,-por--project: Client/project ID or name to include (repeatable; empty = all)--type: Initial target type oncreate:email(default),s3,google_driveorgit— see target flags below-oor--org: Organization ID or name (overrides configuredorg_id)-for--format: Output format override:prettyorjson
run runs the job immediately, outside its normal cron schedule, using the same delivery path a scheduled run uses. update only changes the flags you pass, including its report/target selection — manage targets themselves with job target.
Targets
A job can deliver to several targets (email, S3, Google Drive or Git). List, add or remove them:
cwclock job target ls -i <job id>
cwclock job target create -i <job id> --type s3 --bucket-name my-bucket --endpoint https://s3.example.com --access-key <key> --secret-key <secret> --region eu-west-1
cwclock job target delete -i <job id> --offset 0
-ior--id: Job ID (required)--type: Target type:email(default),s3,google_driveorgit--offset: Offset of the target to remove, as shown byls(required fordelete)- Email:
--to,--cc(comma/semicolon-separated) - S3:
--bucket-name,--endpoint,--access-key,--secret-key,--region - Google Drive:
--folder-id,--service-account-base64 - Git:
--repo-url,--username,--password,--ssh-private-key,--ssh-private-key-passphrase --path: Optional destination subfolder (s3/google_drive/git target)
Admin (superuser)
Superuser-only commands to manage every organization and user, regardless of membership.
cwclock admin organization ls
cwclock admin organization transfert -i <organization id> --owner <user id>
cwclock admin organization delete -i <organization id>
cwclock admin user ls
cwclock admin user update -i <user id or email> --role confirmed
cwclock admin user set-role superuser -i <user id or email>
cwclock admin user delete -i <user id or email>
admin organization transferttransfers any organization's ownership to another user via--owner <user id>admin user set-role <role>sets a user's global role:superuser,confirmed,disabledorbanadmin user updateaccepts--email,--name,--surname,--passwordand--role, only changing the flags you pass-for--format: Output format override:prettyorjson
Metrics
Get all the available metrics (from the prometheus URL /v1/metrics of the API) with:
cwclock metrics ls
Get a particular metric with:
cwclock metrics get <metric_name>
cwclock metrics get <metric_name>
Notes:
- Wildcard
*is supported to get all the metrics starting with a particular string (e.g:cwclock metrics get "cwclock_projects_*"to get all the metrics starting withcwclock_projects_in their name) - Label filtering is also supported with
--filterflag (e.g:cwclock metrics get "cwclock_task_*" --filter "organization_id=xxxxx-xxxxx-xxxxx-xxxxx"to get the metrics starting withcwclock_task_with the labelorganization_idequal toxxxxx-xxxxx-xxxxx-xxxxx)
AI MCP & Agents
Create MCP server
cwclock ai mcp
cwclock ai mcp -l 127.0.0.1 -p 8080 -e /mcp
Create agent calling the mcp server
cwclock ai agent -p "List the indexes"
cwclock ai agent -p "Search *" -s "http://127.0.0.1:8080/mcp" --provider anthropic
Note: available providers are anthropic, openai, deepseek or openrouter, for now you can configure your keys like this:
cwclock configure set openai_api_key "your_key"
cwclock configure set anthropic_api_key "your_key"
cwclock configure set openrouter_api_key "your_key"
cwclock configure set deepseek_api_key "your_key"
cwclock configure set gemini_api_key "your_key"
cwclock configure set mistral_api_key "your_key"
You can also use environment variables instead:
export CWCLOCK_OPENAI_API_KEY="your_key"
export CWCLOCK_ANTHROPIC_API_KEY="your_key"
export CWCLOCK_OPENROUTER_API_KEY="your_key"
export CWCLOCK_DEEPSEEK_API_KEY="your_key"
export CWCLOCK_GEMINI_API_KEY="your_key"
export CWCLOCK_MISTRAL_API_KEY="your_key"
Note: you can also use interactive mode to create your agent with -i or --interactive flag:
cwclock ai agent -i
Create a web agent
You can also use a web server mode to query your agent with HTTP POST requests instead of CLI:
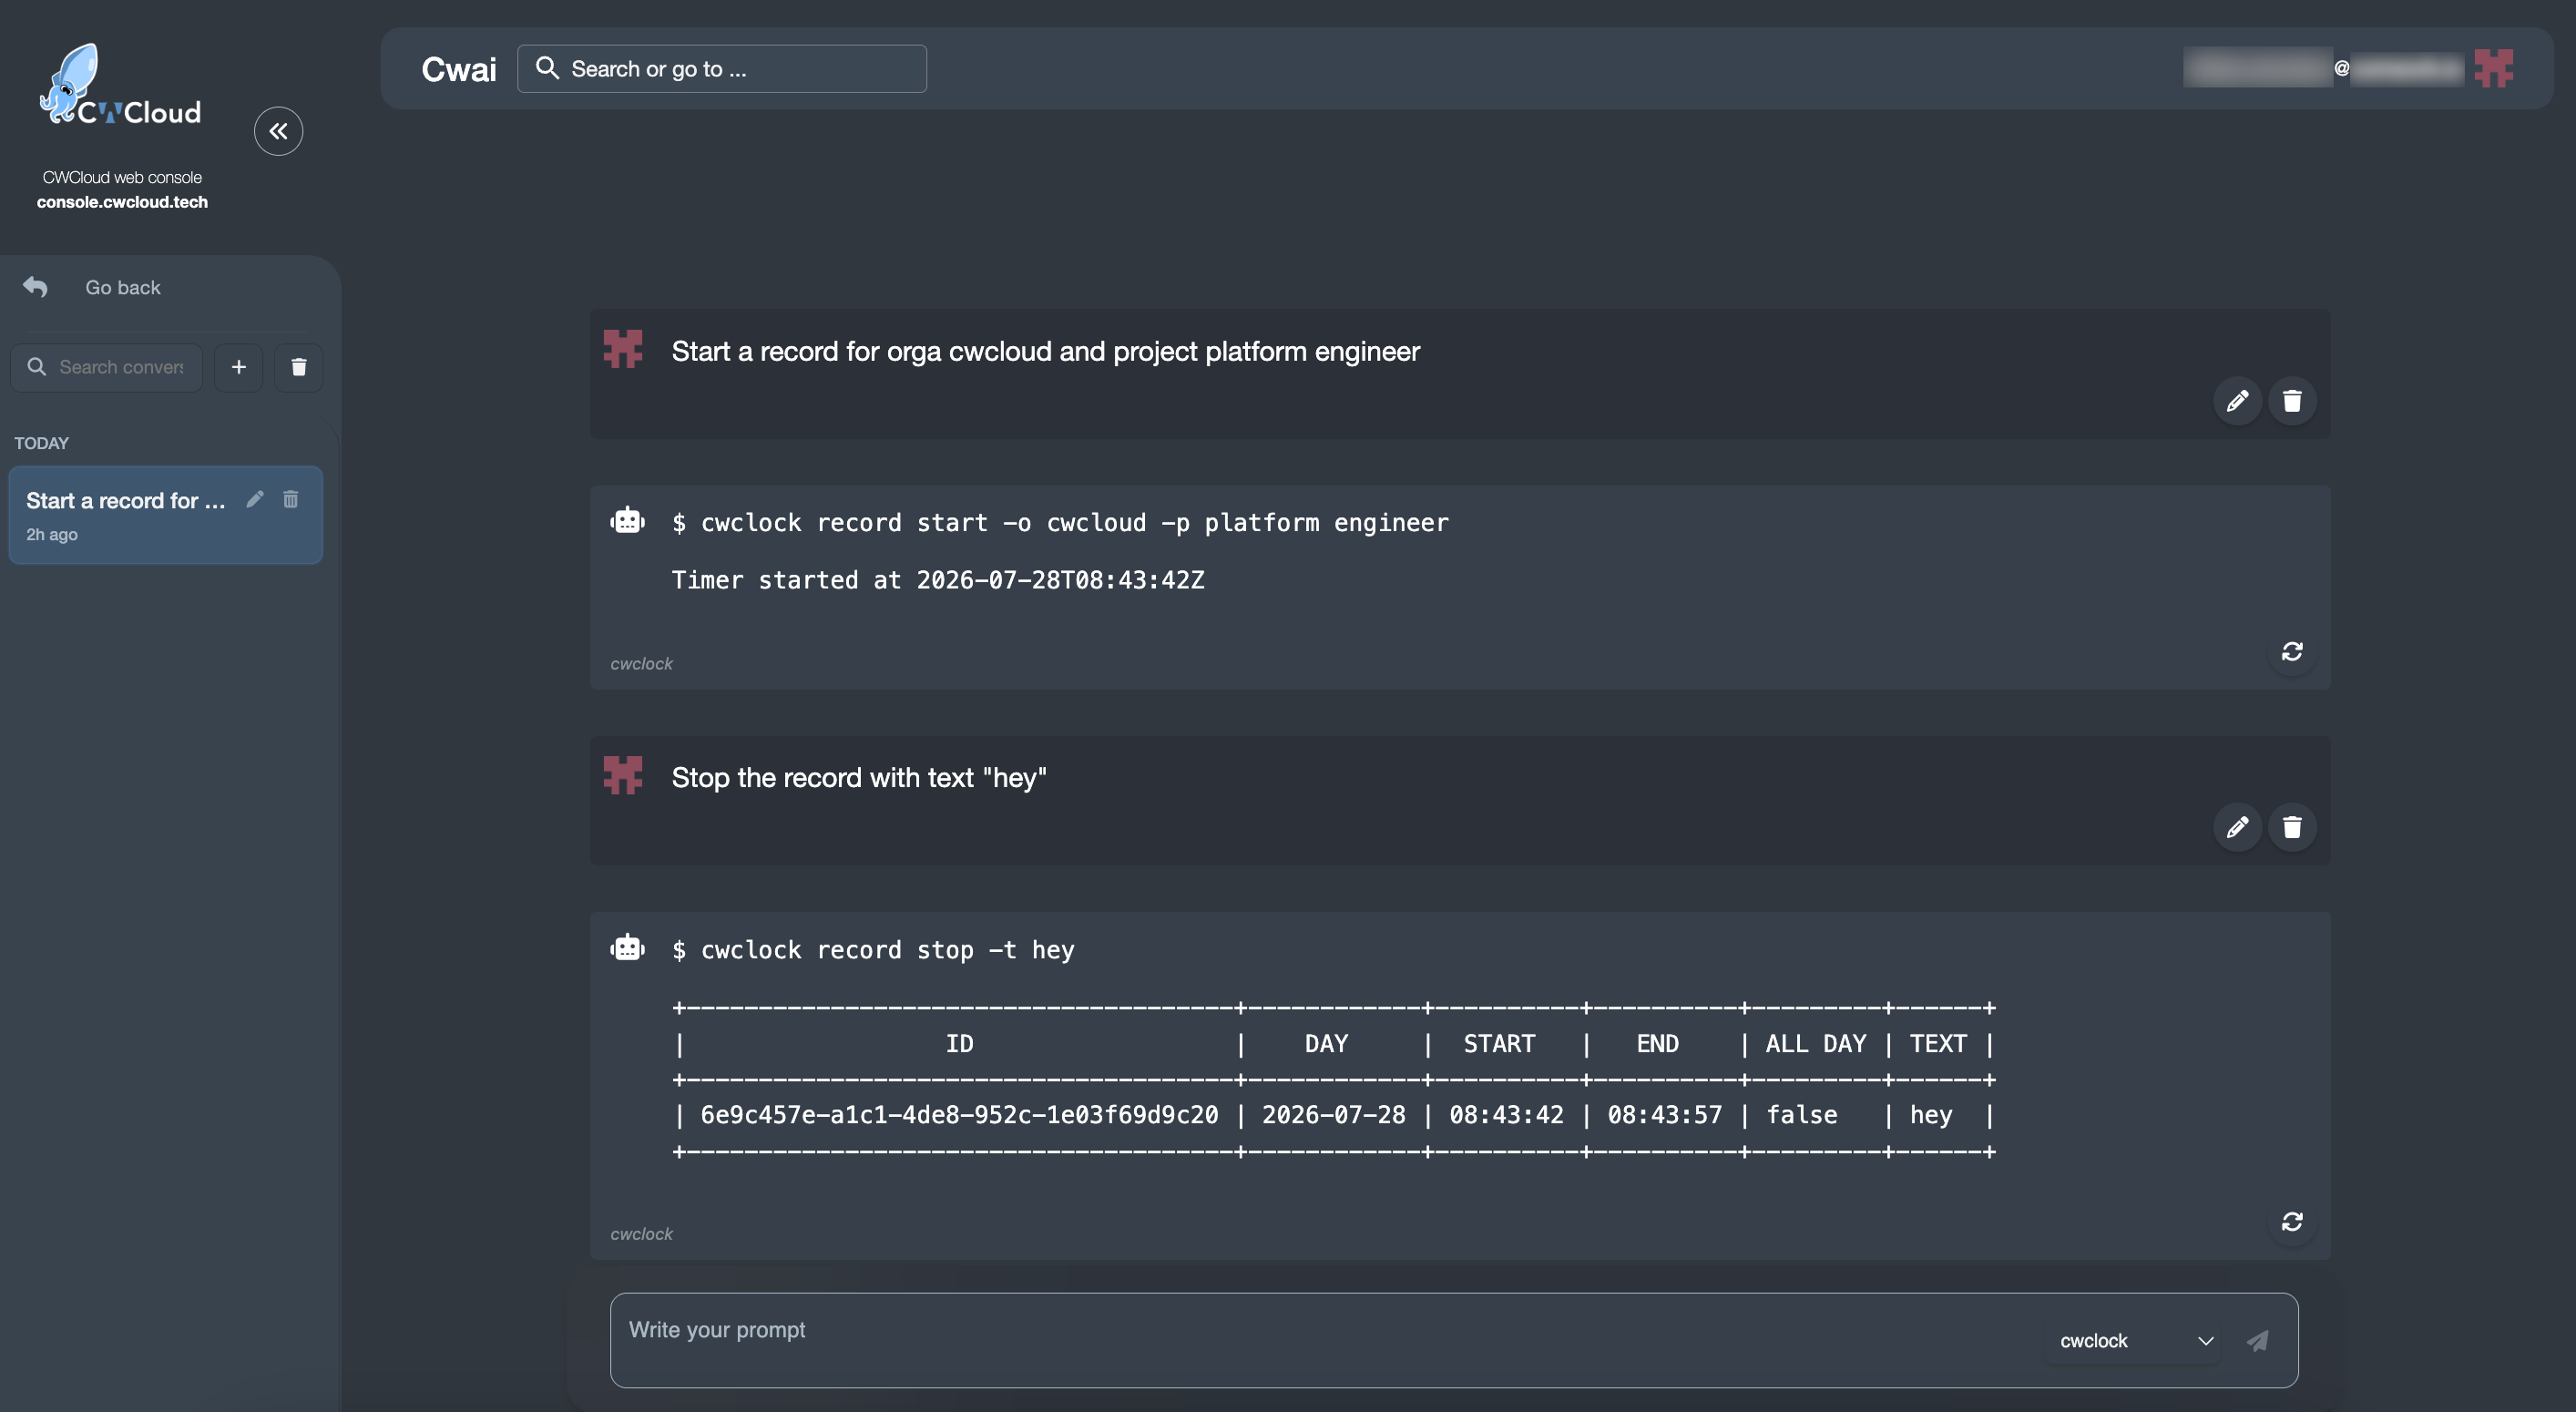
cwclock ai web-agent -a 0.0.0.0 -p 8081
The path / can be configured as an external AI adapter and you'll be able to use it in the CWCloud's AI chat:
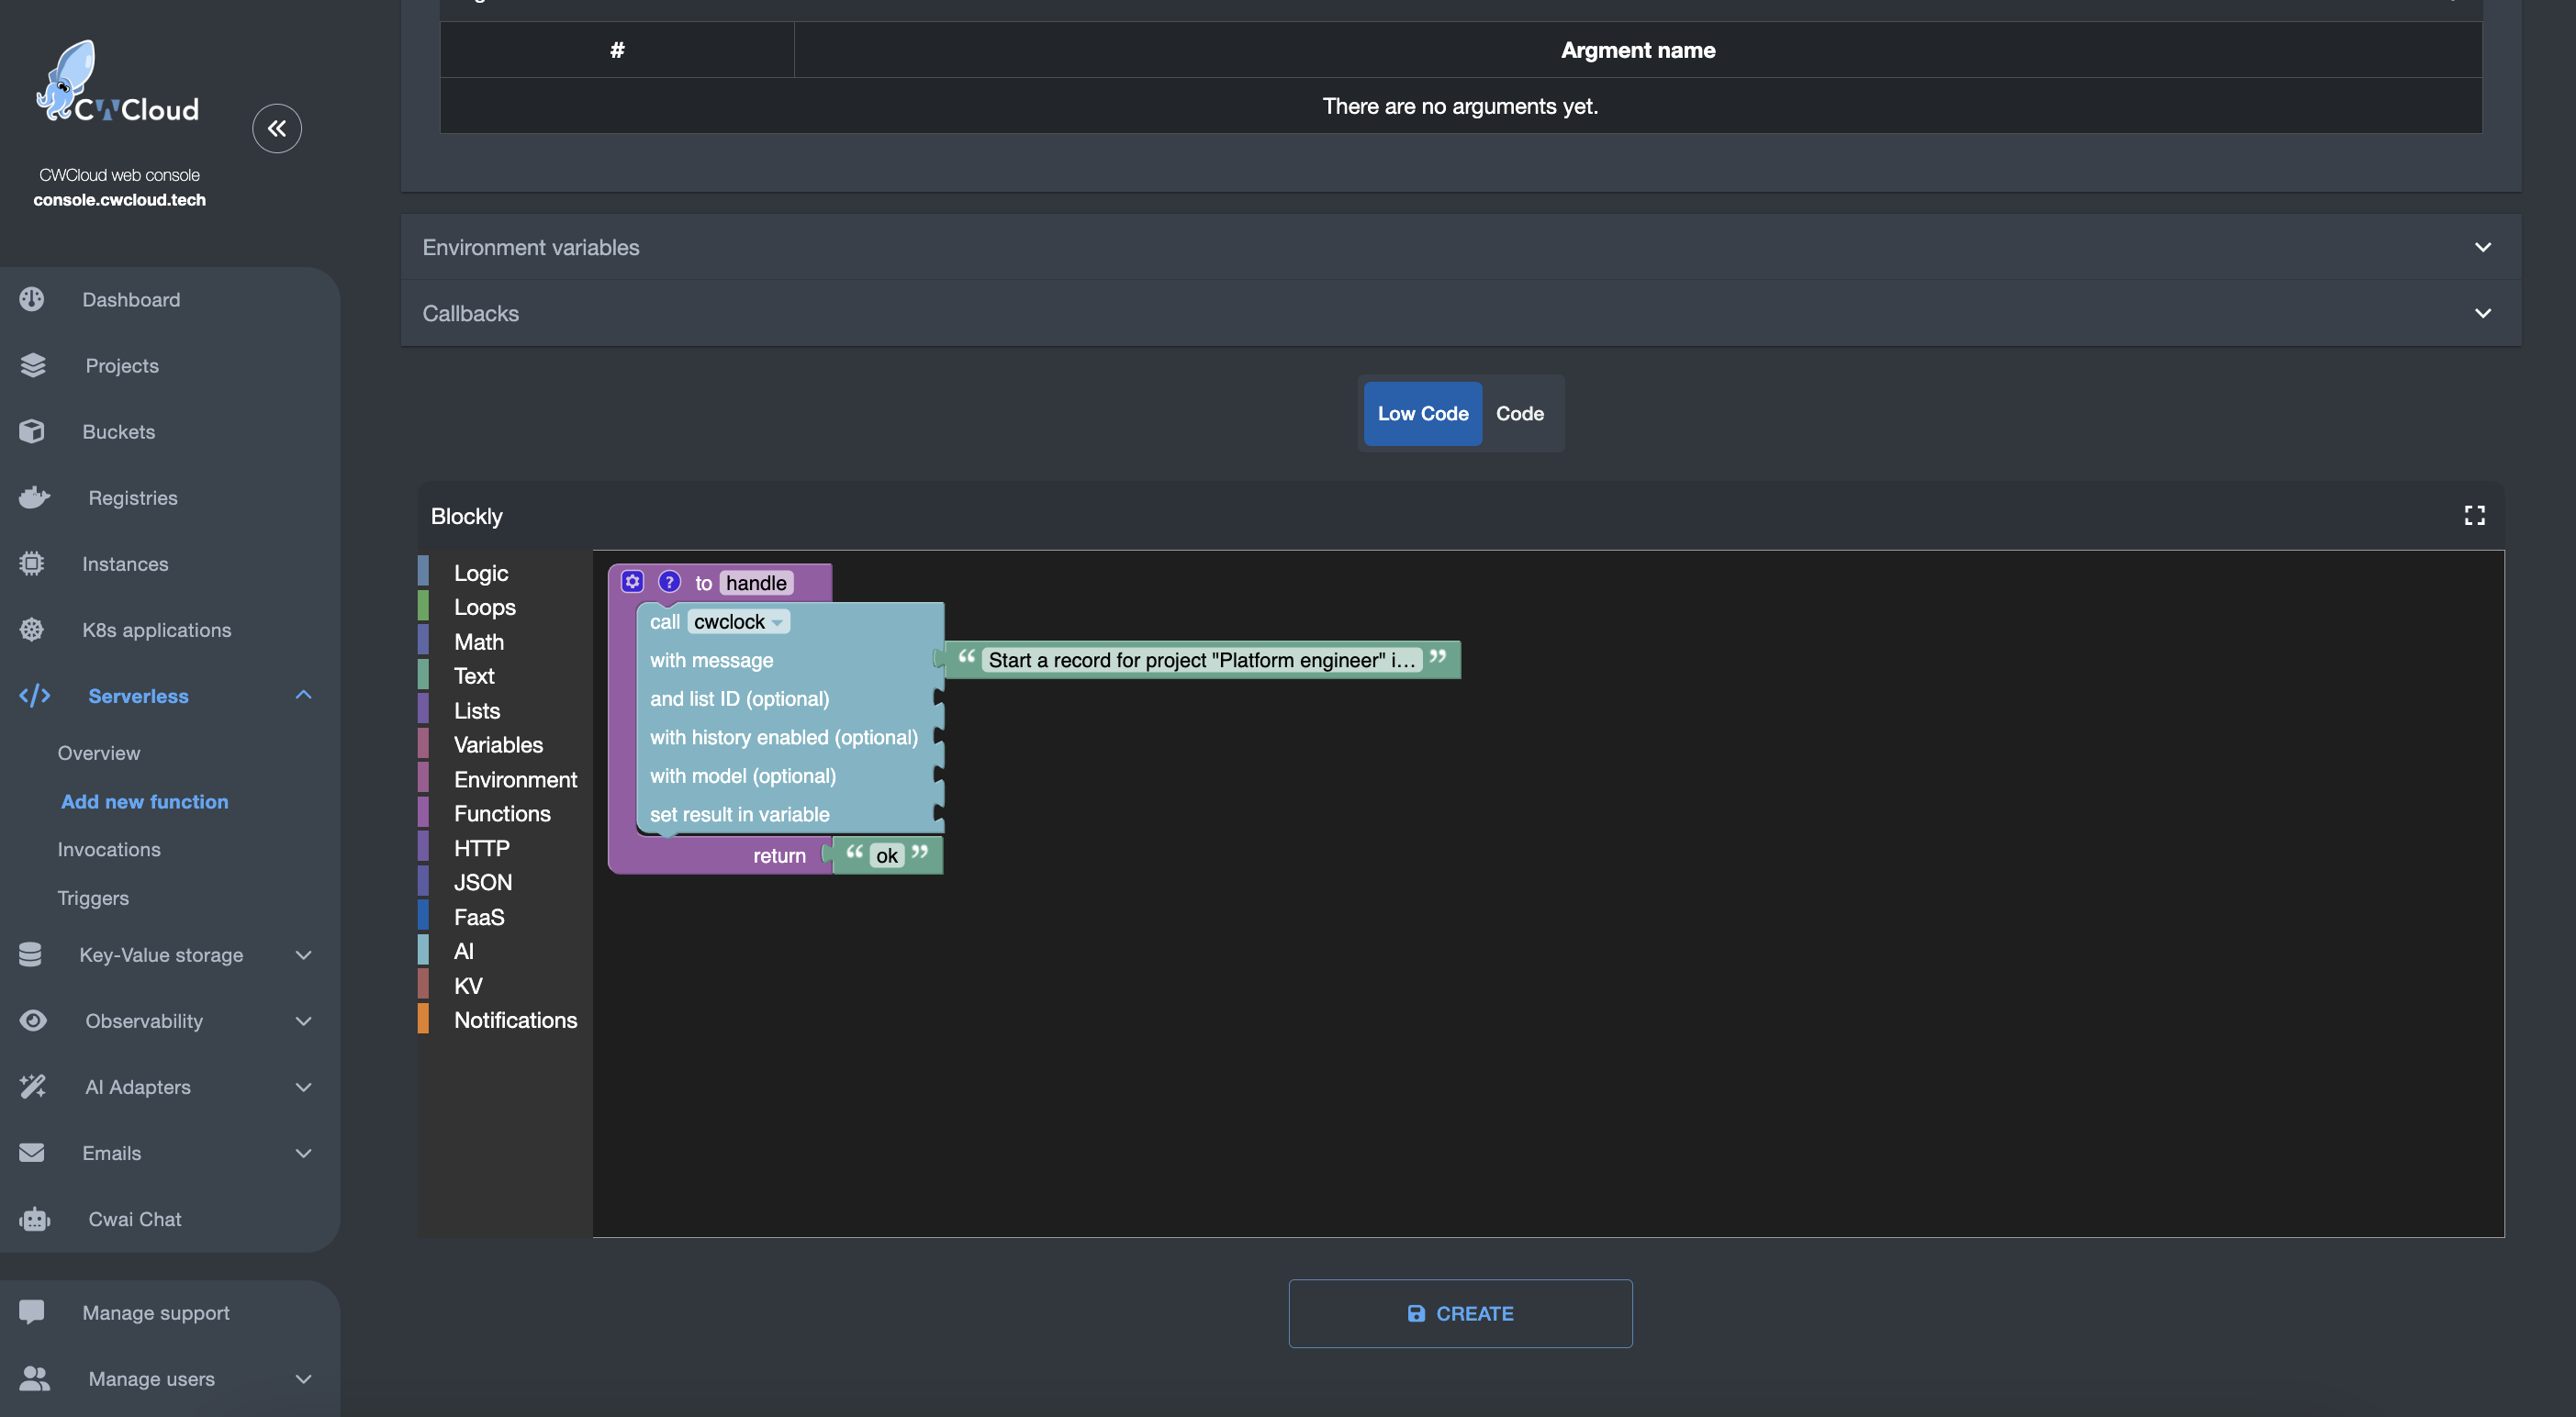
Or in CWCloud's serverless functions/cron jobs:
Or using it directly with Aristochat.
The path /gitlab as a gitlab webhook if you set the following configurations:
cwclock configure set gitlab_base_url "https://gitlab.cwcloud.tech"
cwclock configure set gitlab_token "your_gitlab_token"
cwclock configure set gitlab_webhook_secret "your webhook secret"
Or with those environment variables:
export CWCLOCK_GITLAB_BASE_URL="https://gitlab.cwcloud.tech"
export CWCLOCK_GITLAB_TOKEN="your_gitlab_token"
export CWCLOCK_GITLAB_WEBHOOK_SECRET="your webhook secret"
List all the MCP tools available
cwclock ai agent -p "list_mcp_dynamic_tools"
Note: a cwclock MCP server has to be running for this command to work