Quickwit CLI
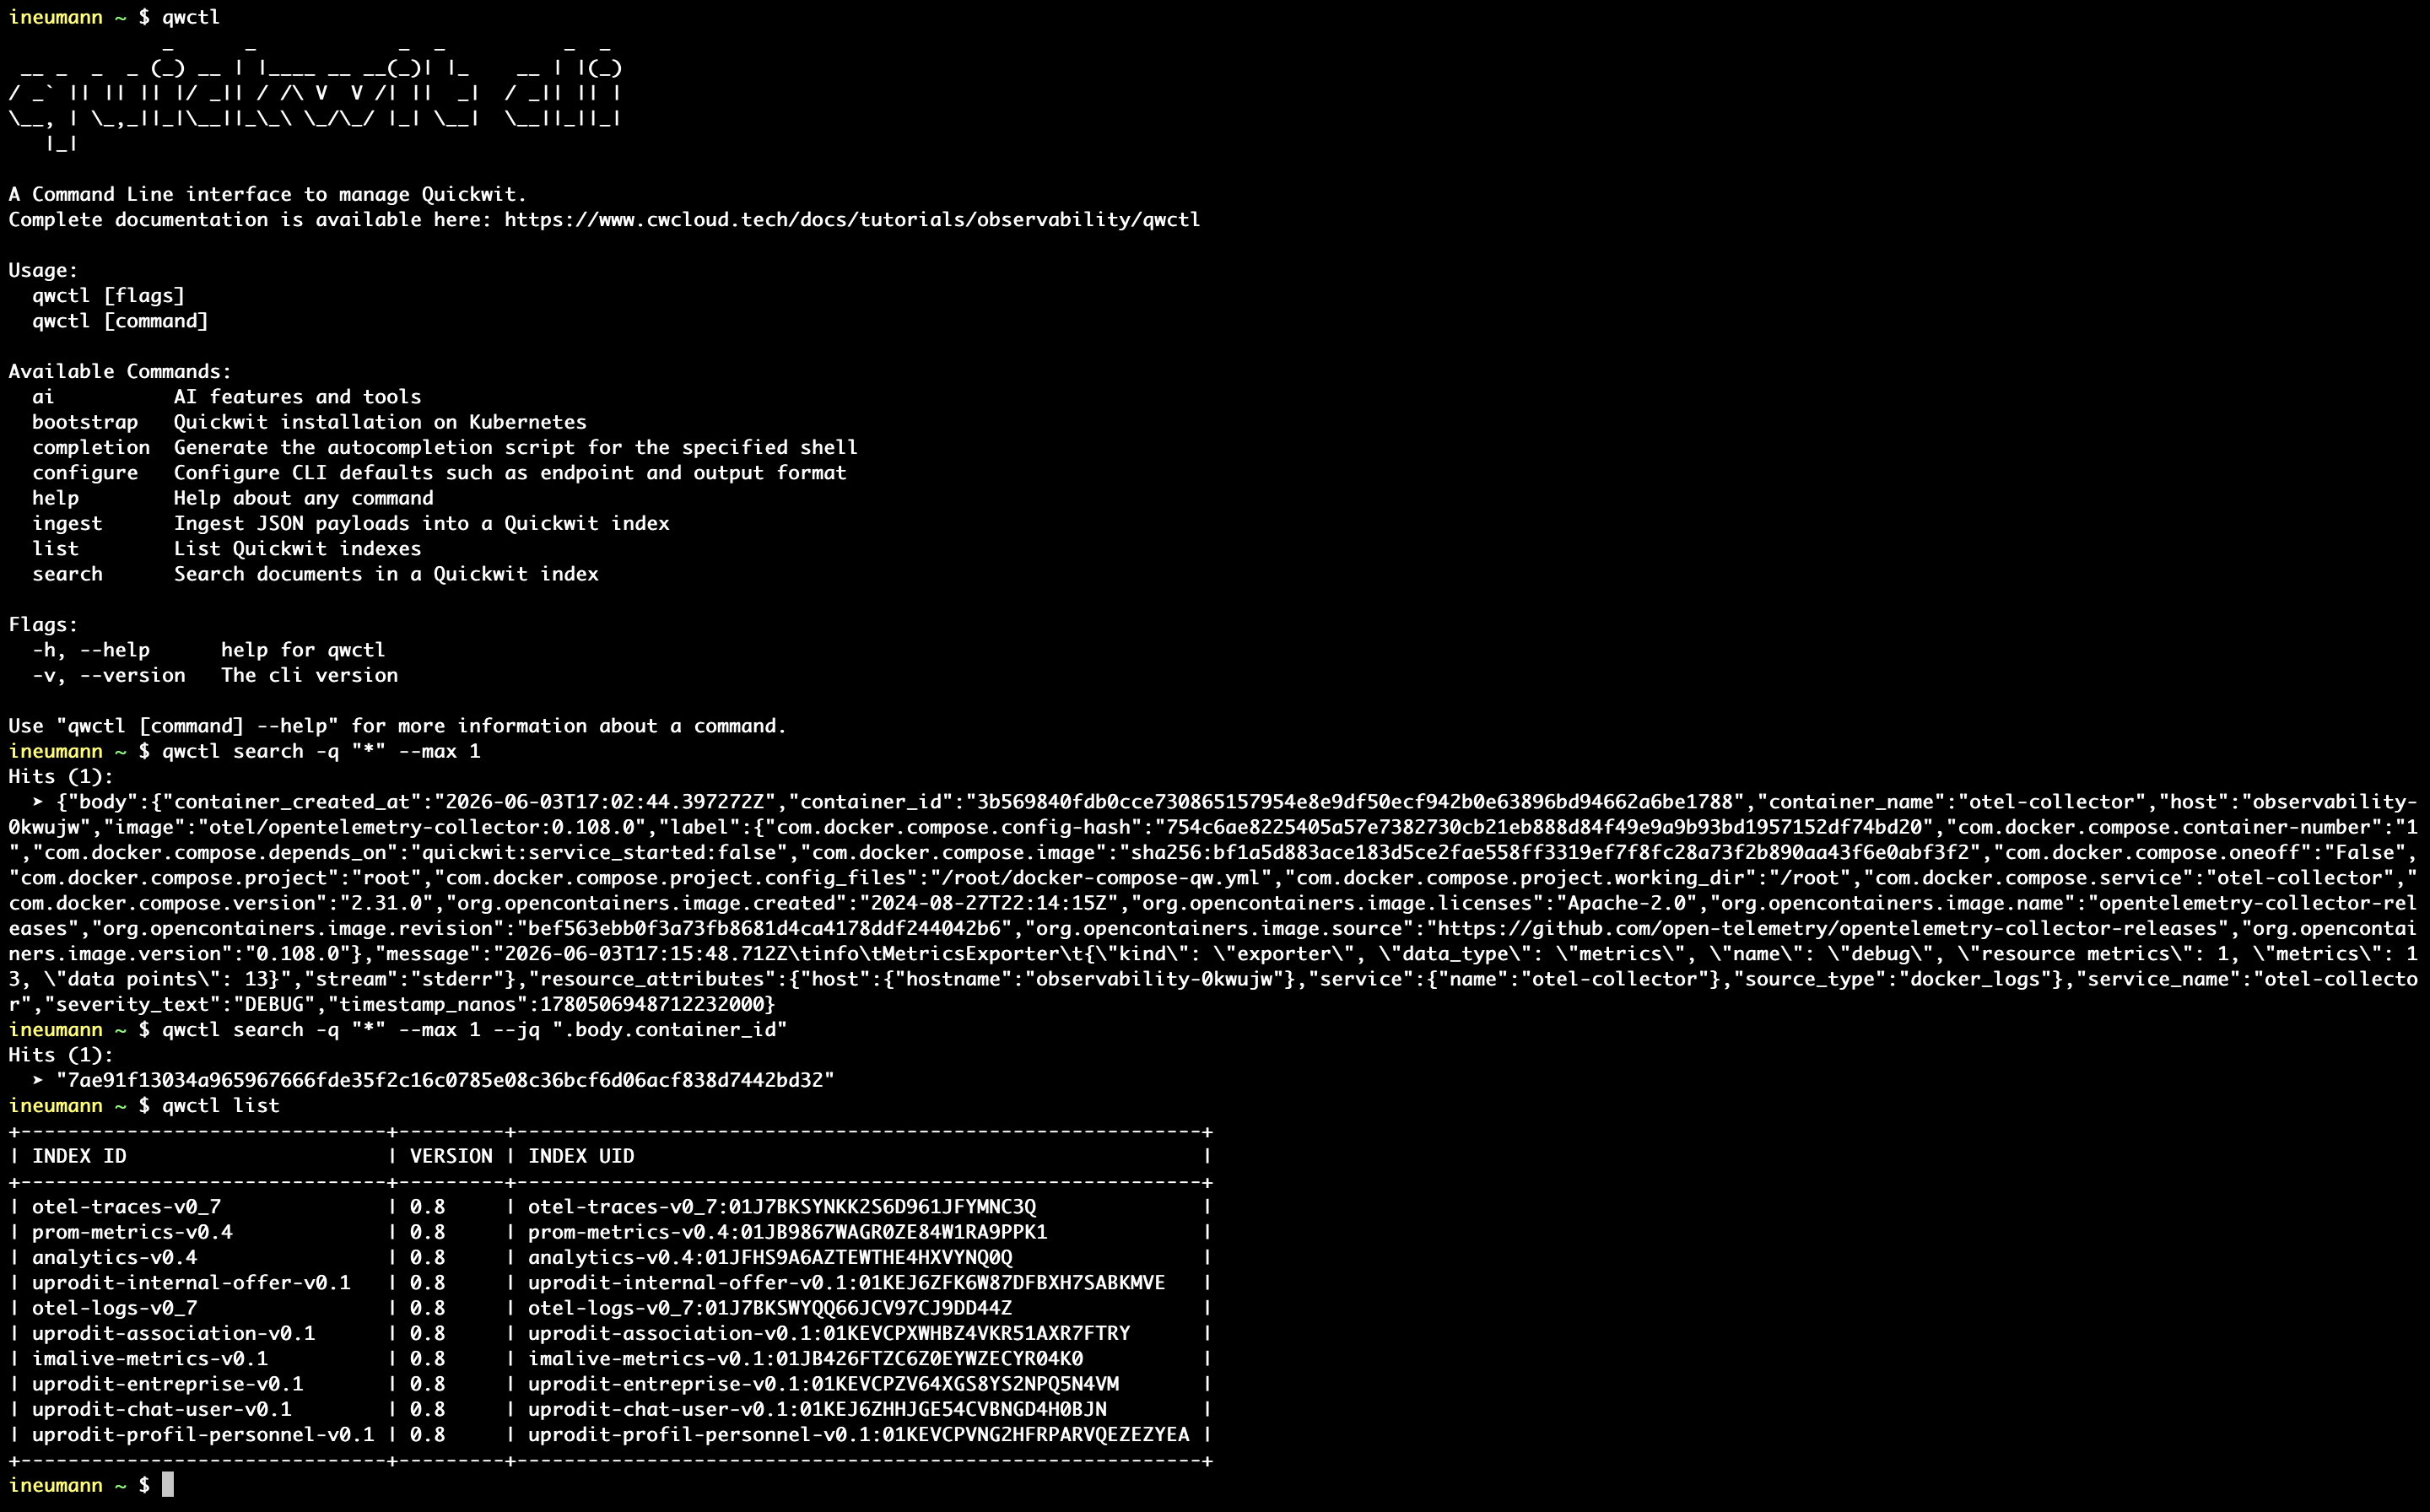
We provide an OpenSource1 CLI called qwctl to interact with Quickwit. You can use it to ingest or search documents and also use it as MCP server for your AI agents.
Video demo
Installation
Choose the installation mode that suits your operating system and follow the instructions.
Homebrew
First installation:
brew tap qwctl/qwctl https://gitlab.cwcloud.tech/oss/quickwit/homebrew-qwctl.git
brew trust --formula qwctl/qwctl/qwctl
brew install qwctl
Upgrade:
brew update
brew upgrade qwctl
Curl
Linux
Linux x86 (64 bit)
version="1.5.1"
curl -L "https://gitlab.cwcloud.tech/oss/quickwit/qwctl/-/releases/v${version}/downloads/quickwit/qwctl_${version}_linux_amd64.tar.gz" -o "qwctl_cli.tar.gz"
mkdir qwctl_cli && tar -xf qwctl_cli.tar.gz -C qwctl_cli
sudo ./qwctl_cli/install.sh
Beware of checking if the version is available in the releases because we only keep the 5 last builds.
Linux arm (64 bit)
version="1.5.1"
curl -L "https://gitlab.cwcloud.tech/oss/quickwit/qwctl/-/releases/v${version}/downloads/quickwit/qwctl_${version}_linux_arm64.tar.gz" -o "qwctl_cli.tar.gz"
mkdir qwctl_cli && tar -xf qwctl_cli.tar.gz -C qwctl_cli
sudo ./qwctl_cli/install.sh
Beware of checking if the version is available in the releases because we only keep the 5 last builds.
MacOS
MacOS x86/arm (64 bit)
version="1.5.1"
curl -L "https://gitlab.cwcloud.tech/oss/quickwit/qwctl/-/releases/v${version}/downloads/quickwit/qwctl_${version}_darwin_all.tar.gz" -o "qwctl_cli.tar.gz"
mkdir qwctl_cli && tar -xf qwctl_cli.tar.gz -C qwctl_cli
sudo ./qwctl_cli/install.sh
Beware of checking if the version is available in the releases because we only keep the 5 last builds.
Windows
Direct download
You can directly download from here. Choose the right architecture (amd64 or arm64), download, unzip and you'll find an exe file there.
Windows x86 (64 bit) with Powershell
$version = "1.5.1"
$user = "YOUR_USER"
cd "C:\Users\${user}"
Invoke-WebRequest -Uri "https://gitlab.cwcloud.tech/oss/quickwit/qwctl/-/releases/v${version}/downloads/quickwit/qwctl_${version}_windows_amd64.zip" -OutFile "qwctl_cli.zip"
Expand-Archive -Path "qwctl_cli.zip" -DestinationPath "qwctl_cli" -Force
Set-Location "qwctl_cli"
.\qwctl.exe
Beware of checking if the version is available in the releases because we only keep the 5 last builds.
Windows arm (64 bit) with Powershell
$version = "1.5.1"
$user = "YOUR_USER"
cd "C:\Users\${user}"
Invoke-WebRequest -Uri "https://gitlab.cwcloud.tech/oss/quickwit/qwctl/-/releases/v${version}/downloads/quickwit/qwctl_${version}_windows_arm64.zip" -OutFile "qwctl_cli.zip"
Expand-Archive -Path "qwctl_cli.zip" -DestinationPath "qwctl_cli" -Force
Set-Location "qwctl_cli"
.\qwctl.exe
Installation of quickwit using the CLI
qwctl bootstrap
Available flags:
-ror--release: Release name for deployment (default:qwctl)-nor--namespace: Namespace to use for deployment (default:qwctl)-kor--keep-dir: Keep the local helm directory-dor--recreate-ns: Recreate the namespace-oor--openshift: Use openshift cli instead of kubectl-por--value: Values to override configurations (can be repeated)--directory: Change the directory folder location (usefull if you want to use your own helm templates)--kind-cluster: Specify the kind cluster to use (it'll be recreated even if it already exists)
Example:
qwctl bootstrap -r my-release -n production --value key=value --value values-override.yaml
Open tunnels
qwctl bootstrap pfw
Opens tunnels (or port forward) to the different services.
You can override the configuration like this:
qwctl bootstrap pfw --config my-pfw-config.yml
Expected YAML configuration format:
---
pfwConfigs:
  - name: "imalive-{{namespace}}"
    port: 8089
    targetPort: 8089
  - name: "quickwit-searcher"
    port: 7280
    targetPort: 7280
  - name: "{{namespace}}-grafana"
    port: 80
    targetPort: 8081
    secret:
      name: "{{namespace}}-grafana"
      user: "admin-user"
      password: "admin-password"
Configuration
qwctl configure
qwctl configure set format pretty
qwctl configure set endpoint https://quickwit.changeit.org
qwctl configure set basic_auth_username <your user>
qwctl configure set basic_auth_password <your password>
qwctl configure set authorization_header_name Authorization
qwctl configure set authorization_header_value "Basic <your base64 encoded credentials>"
Note: it's also possible to use environment variables QWCTL_{VAR_NAME} instead of this configuration file. For example, for the output format you can set QWCTL_FORMAT environment variable to json or pretty.
Cluster infos
qwctl infos
qwctl infos --jq .self_node_id
List the indexes
qwctl list
qwctl list -p "otel-*" # list indexes with a name starting with "otel-"
Create an index
qwctl create -i "my-index" --field key:text --field value:i64
qwctl create -i "my-index" --field key:text --field value:i64 --time-field my-timestamp
qwctl create -i "my-index" --field key:text --field value:i64 --mode strict --max-partitions 200
qwctl create -i "my-metrics" --field "values:array<f64>" --time-field "event-time"
qwctl create -i "my-counters" --field "body:object<key:text, value:u64>" --field "metadata:json" --time-field "event-time"
Prepared schemas/mappings
You can create prepared schema like for prometheus metrics:
qwctl create --schema prometheus
qwctl create -i "my-prometheus-index" --schema prometheus
In order to be able to ingest prometheus metrics with Vector following this blogpost and to query them using PromQL syntax (more details in the search section).
The available schemas are:
prometheus: for prometheus metrics (v0.4)otel-logs: for OpenTelemetry logs (v0.7)otel-traces: for OpenTelemetry traces (v1.2)imalive: for imalive metrics (v0.1)analytics: for web analytics data (v0.4)
External schemas/mapping
You can also use an external schema/mapping file:
qwctl create -i "my-index" --file my-mapping.json
Delete an index
qwctl delete -i "my-index"
Show index details
To show the full index mapping:
qwctl details -i "otel-logs-v0_7"
Filter output with a json query:
qwctl details -i "otel-logs-v0_7" --jq ".version"
Search logs
qwctl search
qwctl search -i "otel-logs-v0_7" -q "*"
qwctl search -i "my-index" -q "foo:bar" --format json --jq ".foo" --max 100
qwctl search -i "my-index" -q='{foo="bar"}' --format json --syntax logql
Notes:
- you can always filter output with a json query and
--jqoption. - the output format can be
jsonorpretty(default) - the search syntax can be
lucene(default),sql,logql(similar to Grafana Loki syntax, close to PromQL) orpromql(in this case your index must be a metrics index created with--prometheusflag)
Ingest documents
qwctl ingest -i "my-index" -b '{"foo": "bar", "time": "2024-01-01T00:00:00Z"}'
qwctl ingest -i "my-index" -f "data.json"
qwctl ingest -i "my-index" -b '{"foo": "bar"}' --time "time"
Metrics
Get all the available metrics (from the prometheus URL /metrics of the API) with:
qwctl metrics ls
Get a particular metric with:
qwctl metrics get -n <metric_name>
qwctl metrics get --name <metric_name>
Notes:
- Wildcard
*is supported to get all the metrics starting with a particular string (e.g:qwctl metrics get -n "quickwit_metastore_*"to get all the metrics starting withquickwit_metastore_in their name) - Label filtering is also supported with
--filterflag (e.g:qwctl metrics get -n "quickwit_metastore_grpc_request_duration_seconds_bucket" --filter "kind=client"to get the metricquickwit_metastore_grpc_request_duration_seconds_bucketwith the labelkindequal toclient)
AI MCP & Agents
Create MCP server
qwctl ai mcp
qwctl ai mcp -l 127.0.0.1 -p 8080 -e /mcp
Create agent calling the mcp server
qwctl ai agent -p "List the indexes"
qwctl ai agent -p "Search *" -s "http://127.0.0.1:8080/mcp" --provider anthropic
Note: available providers are anthropic, openai, deepseek or openrouter, for now you can configure your keys like this:
qwctl configure set openai_api_key "your_key"
qwctl configure set anthropic_api_key "your_key"
qwctl configure set openrouter_api_key "your_key"
qwctl configure set deepseek_api_key "your_key"
qwctl configure set gemini_api_key "your_key"
qwctl configure set mistral_api_key "your_key"
You can also use environment variables instead:
export QWCTL_OPENAI_API_KEY="your_key"
export QWCTL_ANTHROPIC_API_KEY="your_key"
export QWCTL_OPENROUTER_API_KEY="your_key"
export QWCTL_DEEPSEEK_API_KEY="your_key"
export QWCTL_GEMINI_API_KEY="your_key"
export QWCTL_MISTRAL_API_KEY="your_key"
Note: you can also use interactive mode to create your agent with -i or --interactive flag:
qwctl ai agent -i
Create a web agent
You can also use a web server mode to query your agent with HTTP POST requests instead of CLI:
qwctl ai web-agent -a 0.0.0.0 -p 8081
The path / can be configured as an external AI adapter (usable directly from Aristochat) and the path /gitlab as a gitlab webhook if you set the following configurations:
qwctl configure set gitlab_base_url "https://gitlab.cwcloud.tech"
qwctl configure set gitlab_token "your_gitlab_token"
qwctl configure set gitlab_webhook_secret "your webhook secret"
Or with those environment variables:
export QWCTL_GITLAB_BASE_URL="https://gitlab.cwcloud.tech"
export QWCTL_GITLAB_TOKEN="your_gitlab_token"
export QWCTL_GITLAB_WEBHOOK_SECRET="your webhook secret"
List all the MCP tools available
qwctl ai agent -p "list_mcp_dynamic_tools"
Note: a qwctl MCP server has to be running for this command to work
Alerting
qwctl alertmanager -f alerts.yml
qwctl alertmanager -a 127.0.0.1 -p 8083 -f alerts.yml
qwctl alertmanager -a 127.0.0.1 -p 8083 -f alerts.yml --interval 1m
Notes:
1/ an alerts.yml file must be created and contain the alerts you want to create. Here is an example:
---
alerts:
  - name: quickwit_high_ram
    summary: High RAM detected
    description: RAM max over last 5 minutes is above 90%.
    severity: critical
    syntax: promql
    index: prom-metrics-v0.4
    jq: .gauge.value
    labels:
      - name: group
        value: cwcloud
      - name: source
        jq: .tags.source
    threshold: 10
    query: |
      ram_percent[5m]
threshold is the threshold value returned by jq.value, above which the alert is triggered. It can be replaced by hits if you prefer to evaluate the number of documents returned by the query.
2/ Also you can configure an prometheus alertmanager url target like this:
qwctl configure set alertmanager_url http://127.0.0.1:9093/api/v2/alerts
Or with this environment variable:
export EDTCTL_ALERTMANAGER_URL="http://127.0.0.1:9093/api/v2/alerts"
3/ The interval is 1 minute by default, you can use --interval {time}{unit} flag to change it. The unit can be s for seconds, m for minutes, h for hours.
4/ A web server is launched by this command (by default it's accessible on http://127.0.0.1:8083).
The firing alerts are available in a /alerts endpoint.
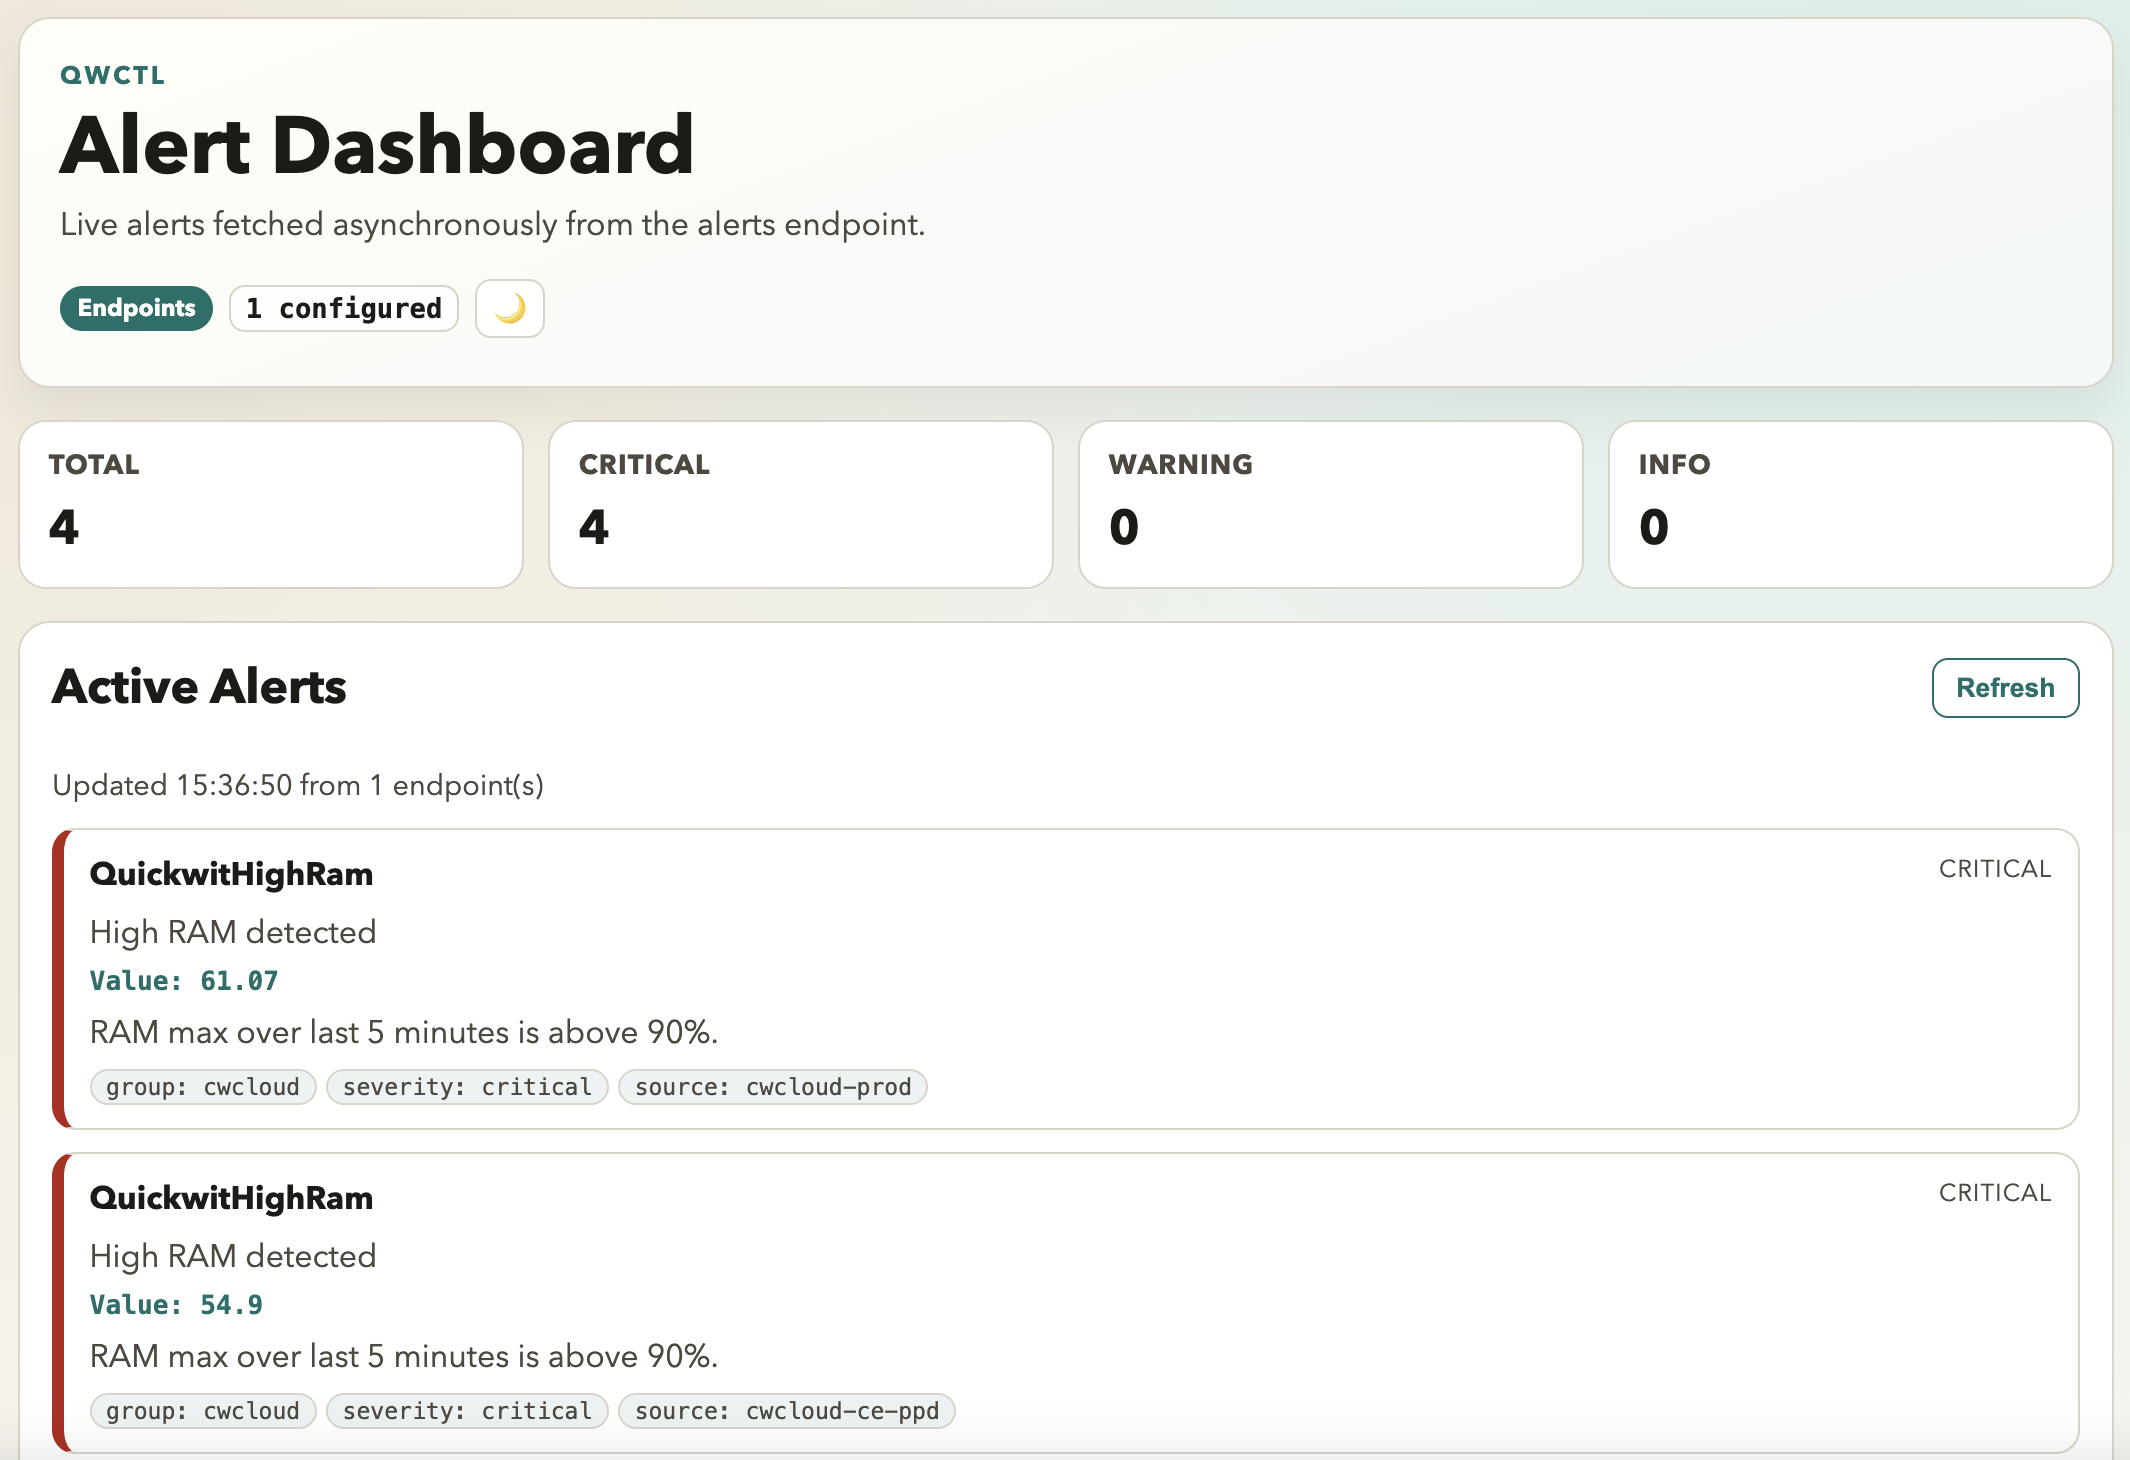
You can also display a web dashboard with the / endpoint: