Extended Dynatrace CLI
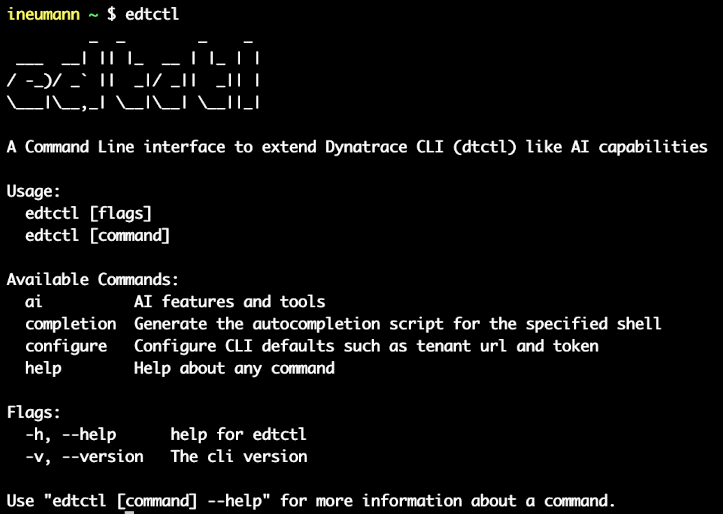
We provide an OpenSource1 CLI called edtctl to extend the official dtctl cli of Dynatrace. as AI agent and MCP server (you can use the MCP server in your own AI agents).
This CLI allows you to expose a MCP server for dtctl or create AI agents easily on top of it.
Requirements
You have to install dtctl first. You can find the installation guide here
You also need a platform token if you want to use edtctl in a docker container (see the configuration section for this part).
Installation
Choose the installation mode that suits your operating system and follow the instructions.
Homebrew
First installation:
brew tap edtctl/edtctl https://gitlab.cwcloud.tech/oss/dynatrace/homebrew-edtctl.git
brew trust --formula edtctl/edtctl/edtctl
brew install edtctl
Upgrade:
brew update
brew upgrade edtctl
Curl
Linux
Linux x86 (64 bit)
version="1.2.2"
curl -L "https://gitlab.cwcloud.tech/oss/dynatrace/edtctl/-/releases/v${version}/downloads/dynatrace/edtctl_${version}_linux_amd64.tar.gz" -o "edtctl_cli.tar.gz"
mkdir edtctl_cli && tar -xf edtctl_cli.tar.gz -C edtctl_cli
sudo ./edtctl_cli/install.sh
Beware of checking if the version is available in the releases because we only keep the 5 last builds.
Linux arm (64 bit)
version="1.2.2"
curl -L "https://gitlab.cwcloud.tech/oss/dynatrace/edtctl/-/releases/v${version}/downloads/dynatrace/edtctl_${version}_linux_arm64.tar.gz" -o "edtctl_cli.tar.gz"
mkdir edtctl_cli && tar -xf edtctl_cli.tar.gz -C edtctl_cli
sudo ./edtctl_cli/install.sh
Beware of checking if the version is available in the releases because we only keep the 5 last builds.
MacOS
MacOS x86/arm (64 bit)
version="1.2.2"
curl -L "https://gitlab.cwcloud.tech/oss/dynatrace/edtctl/-/releases/v${version}/downloads/dynatrace/edtctl_${version}_darwin_all.tar.gz" -o "edtctl_cli.tar.gz"
mkdir edtctl_cli && tar -xf edtctl_cli.tar.gz -C edtctl_cli
sudo ./edtctl_cli/install.sh
Beware of checking if the version is available in the releases because we only keep the 5 last builds.
Windows
Direct download
You can directly download from here. Choose the right architecture (amd64 or arm64), download, unzip and you'll find an exe file there.
Windows x86 (64 bit) with Powershell
$version = "1.2.2"
$user = "YOUR_USER"
cd "C:\Users\${user}"
Invoke-WebRequest -Uri "https://gitlab.cwcloud.tech/oss/dynatrace/edtctl/-/releases/v${version}/downloads/dynatrace/edtctl_${version}_windows_amd64.zip" -OutFile "edtctl_cli.zip"
Expand-Archive -Path "edtctl_cli.zip" -DestinationPath "edtctl_cli" -Force
Set-Location "edtctl_cli"
.\edtctl.exe
Beware of checking if the version is available in the releases because we only keep the 5 last builds.
Windows arm (64 bit) with Powershell
$version = "1.2.2"
$user = "YOUR_USER"
cd "C:\Users\${user}"
Invoke-WebRequest -Uri "https://gitlab.cwcloud.tech/oss/dynatrace/edtctl/-/releases/v${version}/downloads/dynatrace/edtctl_${version}_windows_arm64.zip" -OutFile "edtctl_cli.zip"
Expand-Archive -Path "edtctl_cli.zip" -DestinationPath "edtctl_cli" -Force
Set-Location "edtctl_cli"
.\edtctl.exe
Configuration
edtctl configure
edtctl configure set tenant_url https://YOUR_TENANT.apps.dynatrace.com
edtctl configure set tenant_token YOUR_PLATFORM_TOKEN
Notes:
1/ it's also possible to use environment variables EDTCTL_{VAR_NAME} instead of this configuration file.
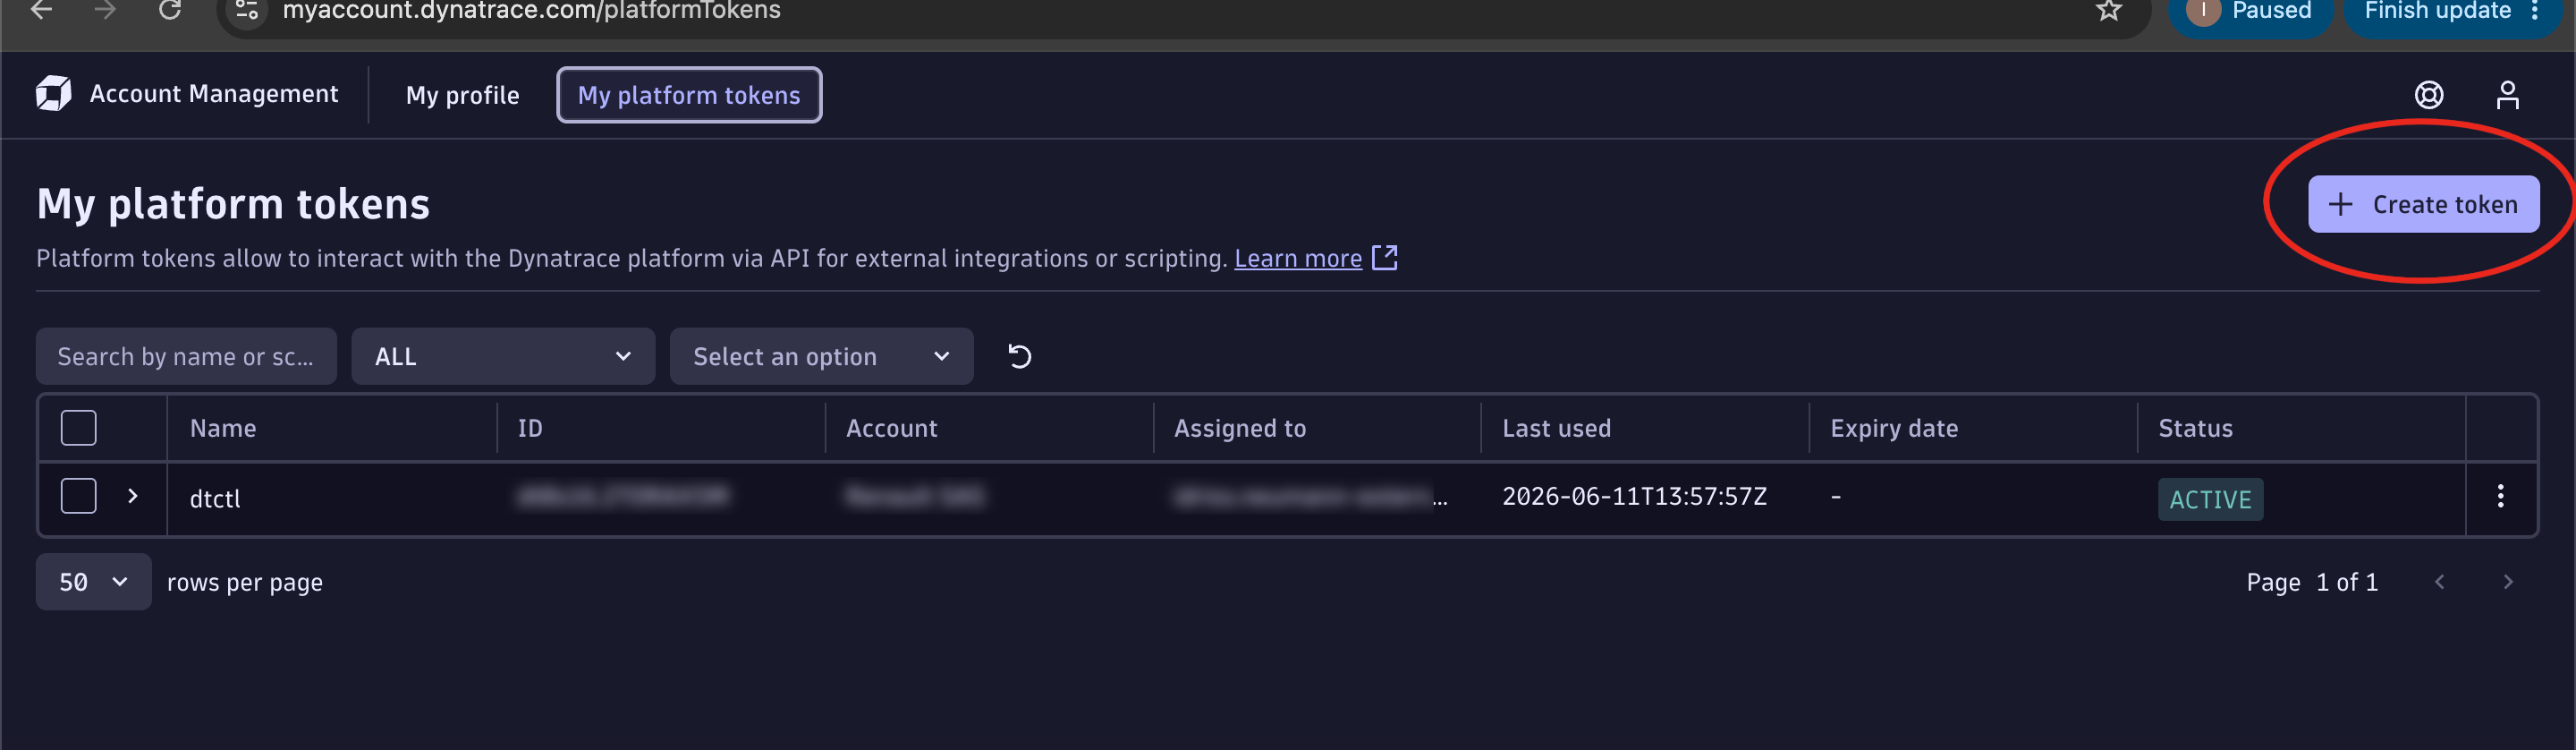
2/ to generate a platform token, go on your tenant GUI:
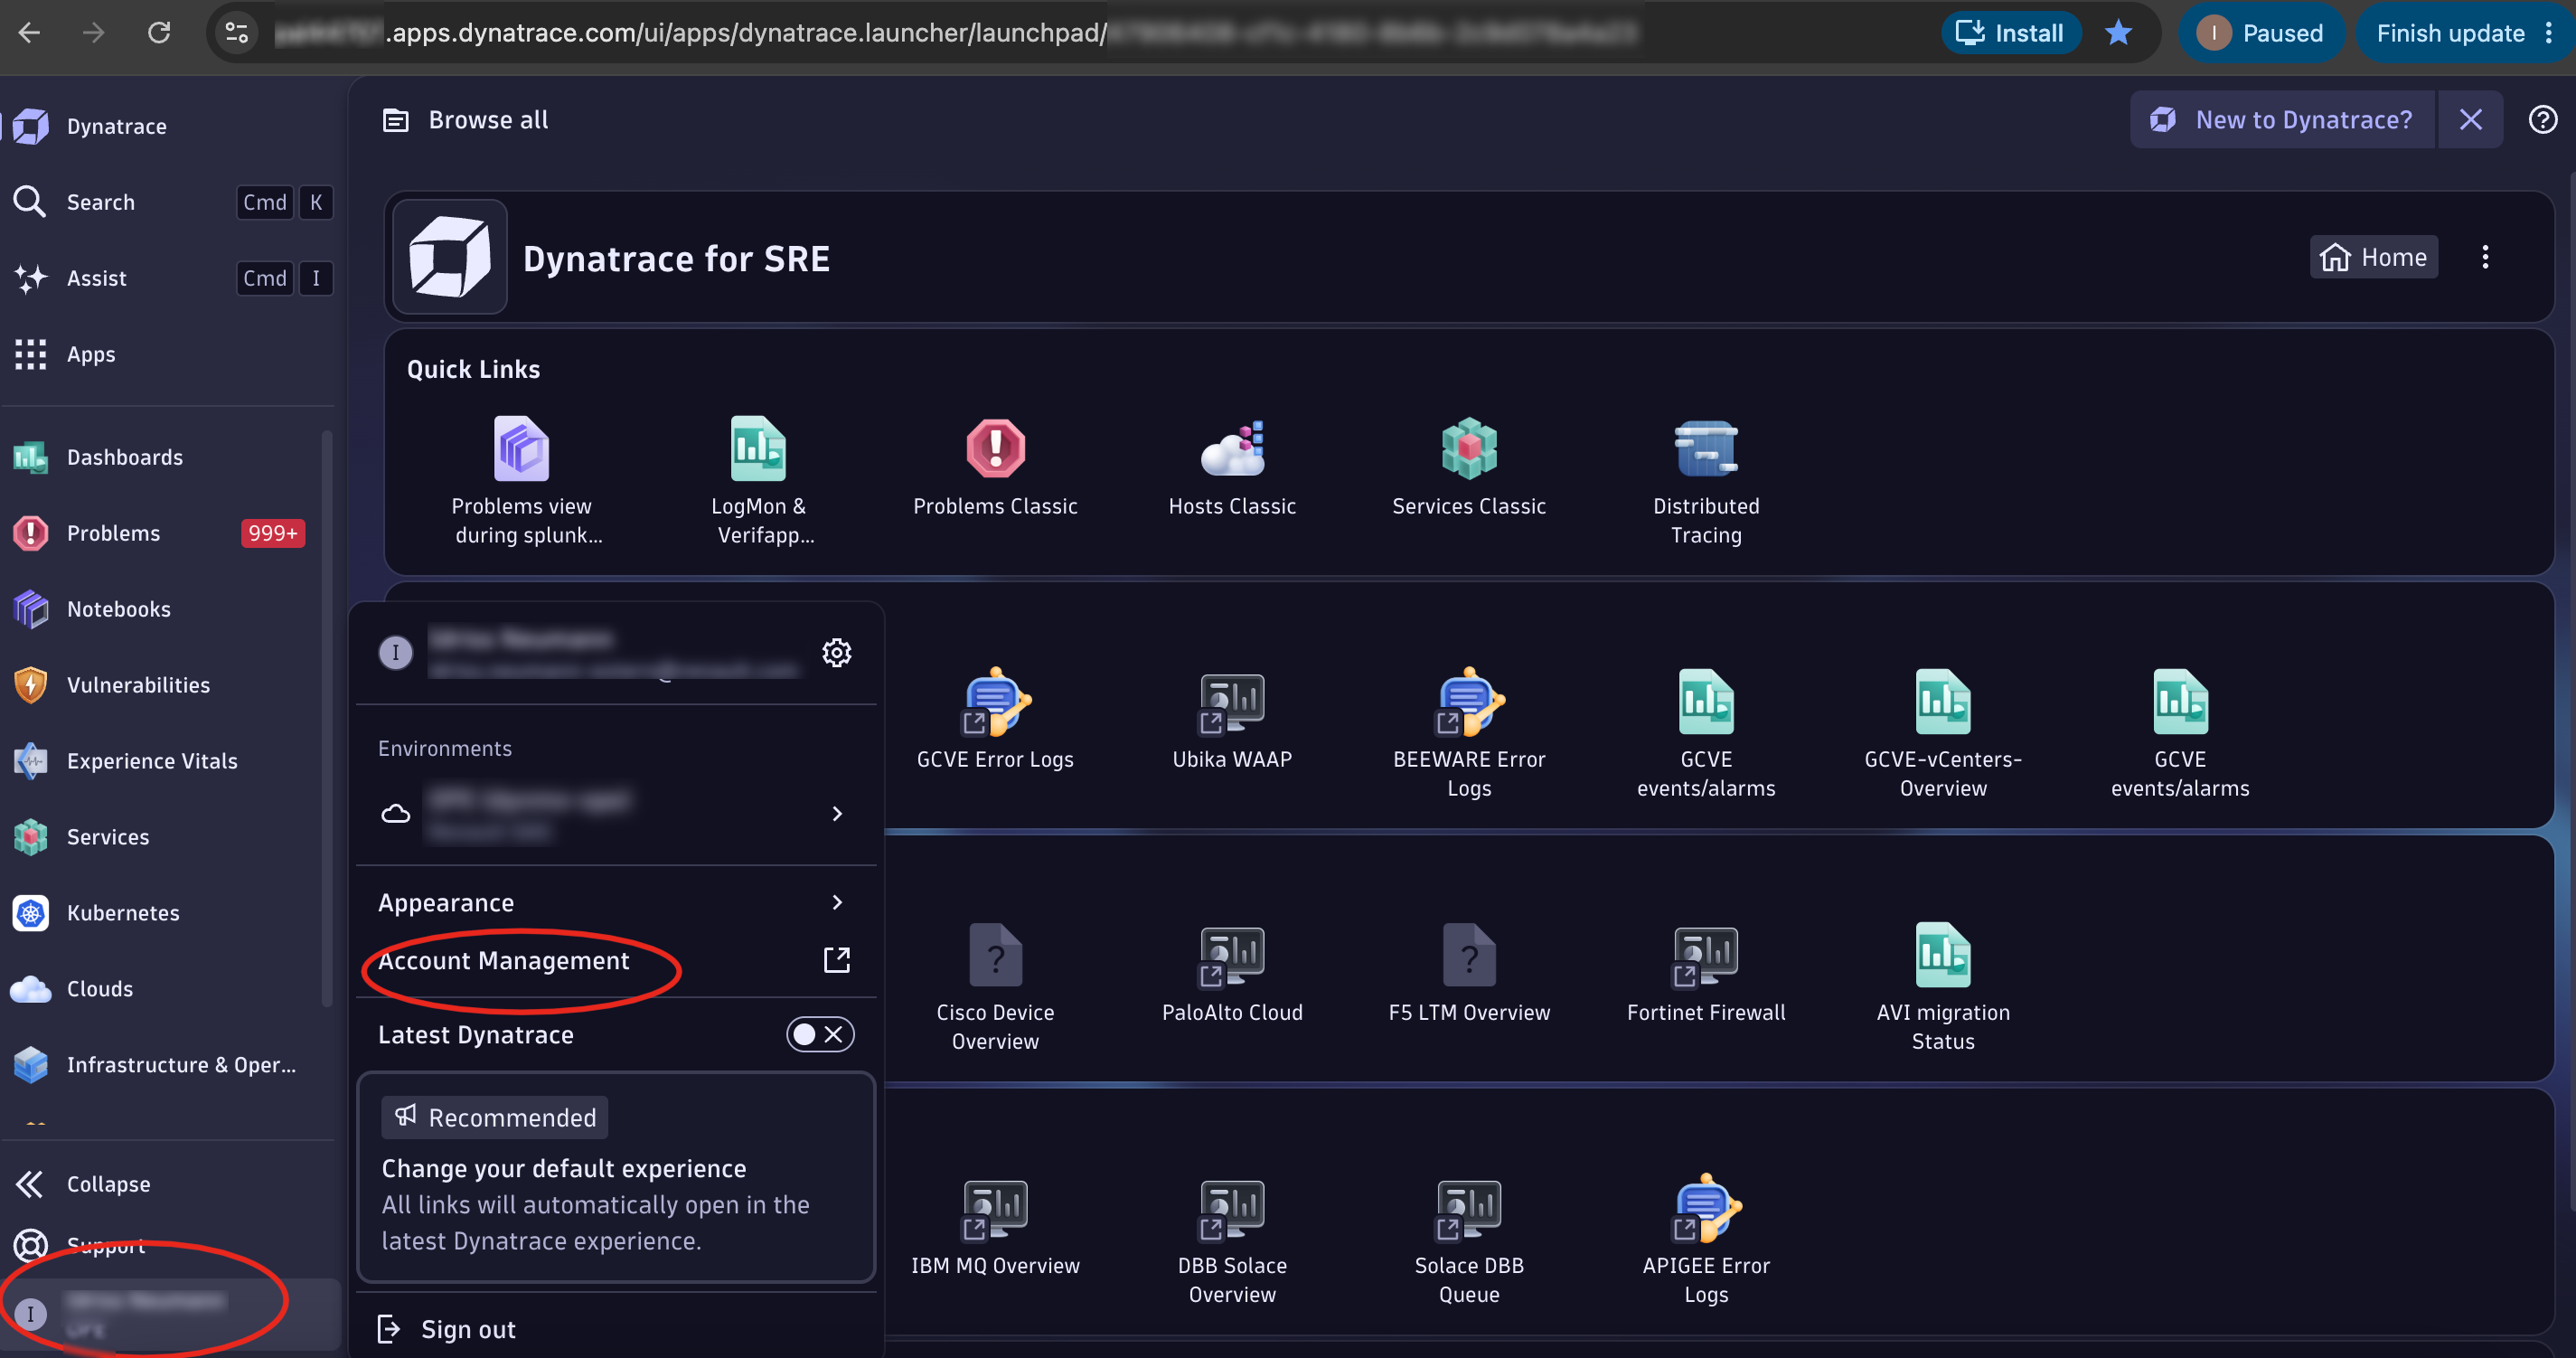
Then:
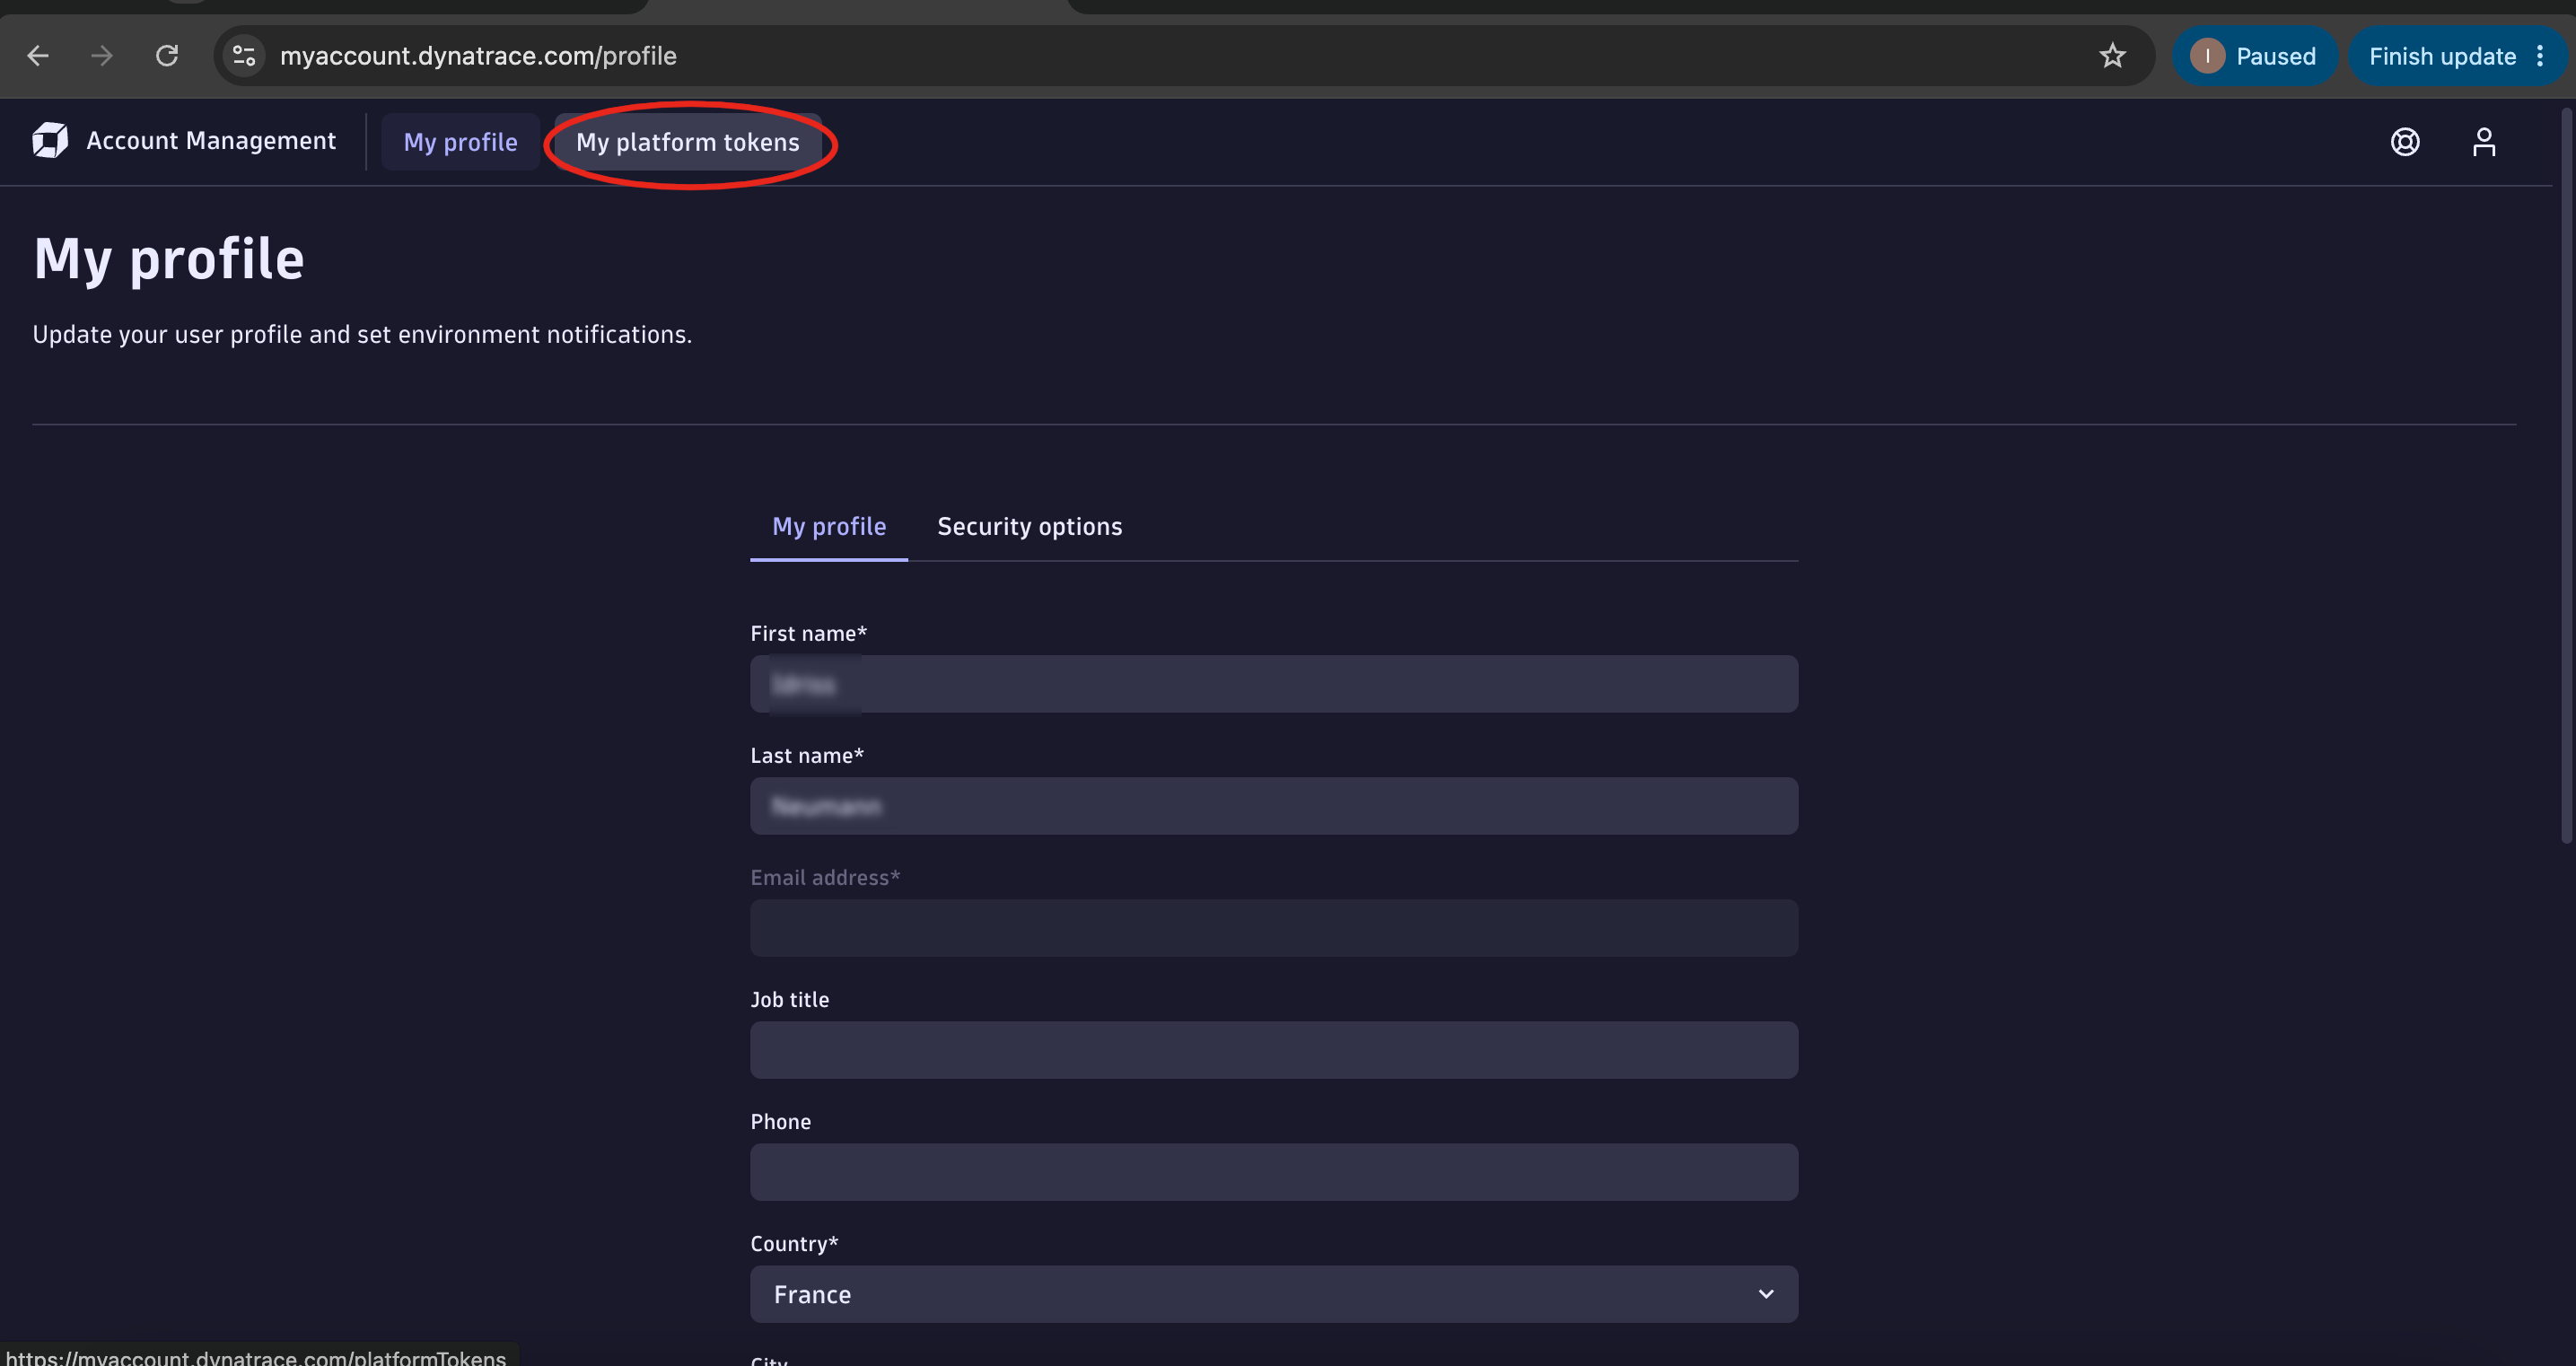
Then:
AI MCP & Agents
Create MCP server
edtctl ai mcp
edtctl ai mcp -l 127.0.0.1 -p 8080 -e /mcp
Note: if you need to authenticate with dtctl the first time, you can use the --auth flag:
edtctl ai mcp --auth
Create agent calling the mcp server
edtctl ai agent -p "List the indexes"
edtctl ai agent -p "Last log in json format" -s "http://127.0.0.1:8080/mcp" --provider anthropic
Note: available providers are anthropic, openai, deepseek or openrouter, for now you can configure your keys like this:
edtctl configure set openai_api_key "your_key"
edtctl configure set anthropic_api_key "your_key"
edtctl configure set openrouter_api_key "your_key"
edtctl configure set deepseek_api_key "your_key"
edtctl configure set gemini_api_key "your_key"
edtctl configure set mistral_api_key "your_key"
You can also use environment variables instead:
export EDTCTL_OPENAI_API_KEY="your_key"
export EDTCTL_ANTHROPIC_API_KEY="your_key"
export EDTCTL_OPENROUTER_API_KEY="your_key"
export EDTCTL_DEEPSEEK_API_KEY="your_key"
export EDTCTL_GEMINI_API_KEY="your_key"
export EDTCTL_MISTRAL_API_KEY="your_key"
Note: you can also use interactive mode to create your agent with -i or --interactive flag:
edtctl ai agent -i
Create a web agent
You can also use a web server mode to query your agent with HTTP POST requests instead of CLI:
edtctl ai web-agent -a 0.0.0.0 -p 8081
The path / can be configured as an external AI adapter and the path /gitlab as a gitlab webhook if you set the following configurations:
edtctl configure set gitlab_base_url "https://gitlab.cwcloud.tech"
edtctl configure set gitlab_token "your_gitlab_token"
edtctl configure set gitlab_webhook_secret "your webhook secret"
Or with those environment variables:
export EDTCTL_GITLAB_BASE_URL="https://gitlab.cwcloud.tech"
export EDTCTL_GITLAB_TOKEN="your_gitlab_token"
export EDTCTL_GITLAB_WEBHOOK_SECRET="your webhook secret"
List all the MCP tools available
edtctl ai agent -p "list_mcp_dynamic_tools"
Note: a edtctl MCP server has to be running for this command to work
Alerting
edtctl alertmanager -f alerts.yml
edtctl alertmanager -a 127.0.0.1 -p 8083 -f alerts.yml
edtctl alertmanager -a 127.0.0.1 -p 8083 -f alerts.yml --interval 1m
Notes:
1/ an alerts.yml file must be created and contain the alerts you want to create. Here is an example:
---
alerts:
  - name: high_cpu
    summary: High CPU detected
    description: CPU max over last 5 minutes is above 90%.
    severity: critical
    group: my-org
    dql: |
      timeseries cpu_usage = avg(dt.host.cpu.usage),
      by: dt.entity.host,
      interval: 1m,
      from: -5m
      | fieldsAdd cpu_current = arrayLast(cpu_usage)
      | fieldsAdd cpu_max_5m = arrayMax(cpu_usage)
      | filter cpu_max_5m > 90
      | fields dt.entity.host, cpu_current, cpu_max_5m, timeframe
2/ Also you can configure an prometheus alertmanager url target like this:
edtctl configure set alertmanager_url http://127.0.0.1:9093/api/v2/alerts
Or with this environment variable:
export EDTCTL_ALERTMANAGER_URL="http://127.0.0.1:9093/api/v2/alerts"
3/ The interval is 1 minute by default, you can use --interval {time}{unit} flag to change it. The unit can be s for seconds, m for minutes, h for hours.
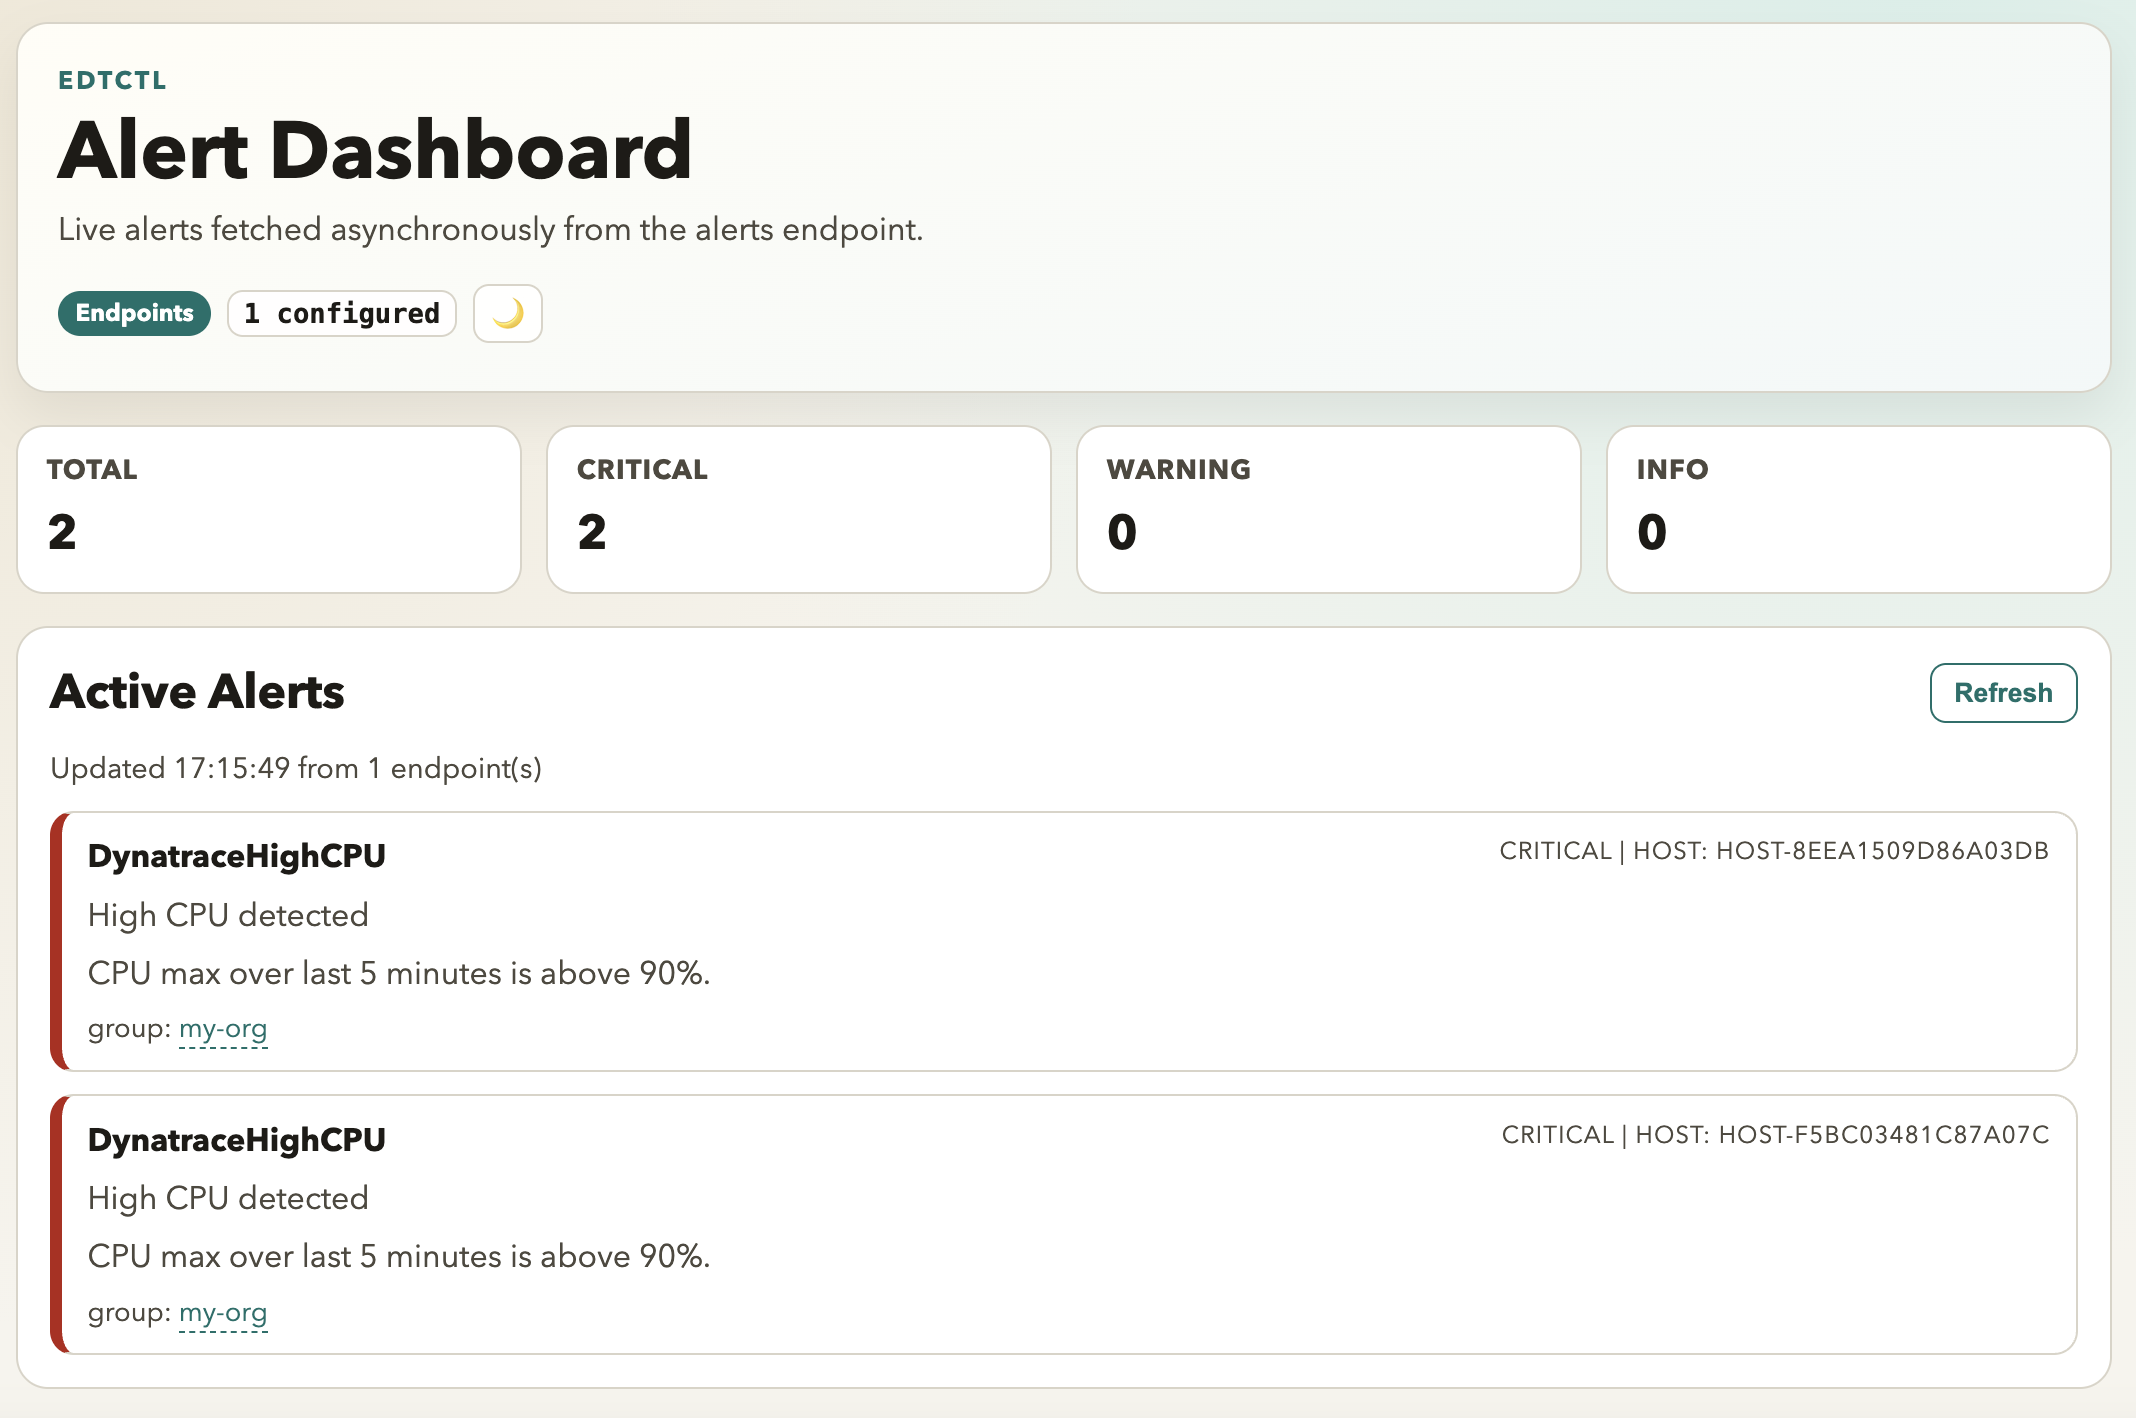
4/ A web server is launched by this command (by default it's accessible on http://127.0.0.1:8083).
The firing alerts are available in a /alerts endpoint.
You can also display a web dashboard with the / endpoint: